Strings back on for final testing and setup.
|
(5/17/18) Left:. Strings back on again and doing some final testing of nut slots, playing action, string alignment, intonation etc etc. Bass is almost complete now and plays well already. Right: Bass is looking really nice. Got most of the final details taken care of - still have to attach the back plate over the control cavity and tweak the bridge/truss/action a little. |

Almost done with this very nice instrument.
|
|

Masking off the fingerboard surface from the fret surface so I can get the frets finished.
|
(5/17/18) Left:. Phase 2 of fret dressing (becxause it's a maple fingerboard) I need to mask off the non fret areas so I can be fairly aggressive in the finishing of each fret surface. Right: Just about done with fret dressing and cleanup. The finish applied to the fingerboard is also on the frets and I have to carefully remove that while I am dressing the fret profiles. |

Lots of care required in the process of working on the frets.
|
|

Working on nut which is very accurate work - after which I will spend some time leveling frets and testing the resulting action.
|
(5/17/18) Left:. Working on the nut to get the slots set at just the right depth. Too deeep and you have to start again! I'm pretty close but still working on that. Next job is level the frets. Right: Working on leveling the frets right now in conjunction with refining the depths of the nut slots. Getting those done will help a lot. Also lowered the pot shafts on the 3 controls for better fit. |

I'm doing several jobs on this bass all at the same time and hopefully it will all come together.
|
|

Managed to get the neck to body conditions set up more favorably - get everything re-assembled again and testing things out right now. Lots of little jobs to get done.
|
(5/17/18) Left:. Last night I took the neck off again and did some physical modifications to the heel of the neck and a couple of other parts to adjust neck to body angle. Looks and feels better now. Right: I did a quick sound test to verify that the wiring to and from the preamp was done correctly. Everything worked fine and sounded good from what was a very quick test. |

I was able to do a quick sound test through and amp and was relieved to hear that the wiring worked out fine and everything dod its job electronically.
|
|

The only way to do this cleanup is manually and with patience. I ended up being able to remove all the buildup in the recess so I will put the neck back on and go from there.
|
(5/16/18) Left:. I spent some time cleaning out all residue from the lacquer process so that I have a nice clean neck pocket. I will re-assemble and re-string to see if this made sufficient difference. (5/16/18) Right: Drilled and counterdrilled the holes required for the recesses strap locks on the back and front of the instrument. One more task done - on to the next ones. |

These recesses are a little tricky to do as care is needed not to add stress to the surrounding finish. Got both done and mounted and added soft washers between the metal parts and the instrument.
|
|

Nust slots being roughed in - then I add strings and complete this task.
|
(5/14/18) Left:. Time to get the slots established in the nut. I rough them in and then will add the strings so that I can make finer adjustments to the spacing based on how they look together. (5/15/18) Right: Got the strings on which alows me to test several things. I noticed neck angle slightly acute due to overspray in nack pocket - gonna have to remove that. |

Strings on which allows me to finish nut and test for sound. However neck angle needs adjusted, there was some overspray in the neck pocket which I thought was ok because it was evenly distributed. It;s going to have to cone out - will do that in the morning when the light is good!.
|
|

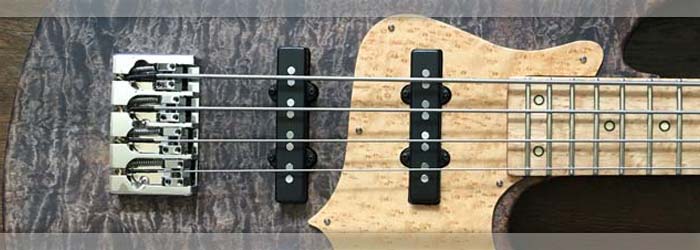
Chrome knobs and bridge look good against the black grain.
|
(5/12/18) Left:. It's late and it's not a very good picture but I was test fitting the knobs and wanted to add a photo showing the top with with the chrome stacked knobs. (5/13/18) Right: All the remaining copper shielding has now been added and I also drilled and screwed on the output jack to the body. I need to now test the output by adding the strings and checking the electronics. |

Cavity work is technically complete - now need to get some strings on this bass so that I can verify sound.
|
|

Only have the pickups to connect now so almost done in the control cavity wiring. Have magnets and a little copper shielding to add.
|
(5/10/18) Left:. Audere in, jack socket and grounding wires connected, battery terminal connected to preamp. Now need to connect the two pickups to everything else. (5/11/18) Right: Tuners have been attached and I have added the nut into the slot at the end of the finegrboards. Nut needs fine tuning and the addition of the string slots so getting ready to do that. |

Tuners have been added and nut has been installed. Moving along as fast as time permits.
|
|

Preamp physically installed, now I have to get everything hooked up.
|
(5/8/18) Left:. Installing the Audere preamp and the potentiometers. Lots of little connections that need to go to the jack socket and the pickup connections. Moving on to that. (5/9/18) Right: I now have the output jack wired to the preamp and the common ground and I will install it in the side of the instrument. Next will be connecting both pickups and power supply. |

I got the output jack wired up to the internal components.
|
|

Holes established for grounding and attachment of bridge.
|
(5/5/18) Left:. Bridge is now attached to the body and I was able to substitute black pickup adjustment screws for the chrome ones I had originally used. It's all coming together. (5/7/18) Right: I just soldered the ground wires for the two pickup cavities and the bridge body and I am now moving on to installing the preamp, battery and output socket into the control cavity. |

Getting busy with the internal wiring to get the control cavity completed.
|
|

I have been doing some internal wiring and now need to place the bridge, establish its retaining holes and drill a hole to connect the bridge to the control cavity shielding.
|
(5/1/18) Left:.I got the pickup recess grounding wires connected to the control cavity shielding and I am now locating the bridge so that I can establish a grounding wire from it to the control cavity. (5/3/18) Right: This photo shows the hole I drilled for bridge grounding wire and the wire and copper tab that will create the connections. I also drilled holes for the attachment of the bridge. |

Holes established for grounding and attachment of bridge.
|
|

Pickguard on, both pickups installed with screws, now getting the electronic stuff taken care of.
|
(4/29/18) Left:.The pickguard is now attached to the body and I'm working on getting all the grounding wires soldered into the control cavity. Preamp will be going in very soon too. (4/30/18) Right: I'm getting the Hipshot tuners ready to go on the headstock of the instrument. First task is to carefully orient the tuners to their correct rotations then mark out the holes for the screws. |

These are the Hipshot tuners I will be putting on the headstock.
|
|

Need the neck pickup set in order to correctly position the pickguard.
|
(4/27/18) Left:. I installed the neck pickup so that I could use its location to position the pickguard. I'm now getting ready to mark and drill the holes for the pickguard screws! (4/28/18) Right: I'm working on installing the jack socket assembly. It turned out to be a fairly involved and delicate dremel job due to the buildup of finishing compound in the recess. More pics coming! |

I had to be very careful to remove lacquer buildup without chipping anything. Got the Neutrik locking jack socket fitted.
|
|

I was able to get the neck attached which will allow me to take a full glamor shot of the instrument!.
|
(4/26/18) Left:. I was able to get the neck attached at least too see how it sits. It's a little snug at the bottom due to spray residue but I will scrape that out. Nice to have it all in one piece! Right: I'm doing a little custom fitting of the end of the neck to make sure I have a comfortable fit between that and the custom wood pickguard. That done - I'll get the pickguard attached. |

Fairly snug fit between all the parts but they are going together pretty well.
|
|

The process of opening out the recesses to allow the retaining washers to fit isn't as easy as it would seem. There's always a danger of chipping the hard finish if you are too aggressive. I was careful and in the end they all fit perfectly in their respective recesses.
|
(4/24/18) Left:. I spent a little time with the dremel tool to get the neck retaining inserts to fit into their recesses. I got that done and I made sure they were all sitting on a nice flat surface. I can get the neck attached now! (4/25/18) Right: Got the through holes to the cavity cleaned up and both pickups set in their recesses. I now have to mark and drill the holes for the adjustment screws. |

Pickups are in and a nice clean fiot with the body. I'm now setting up the 8 adjustment screws.
|
|

As with many other recessed features on a bass that gets a sprayed lacquer, I have to clean out the retaining ring recesses on the back of the body to get a nice solid fit. Once that's done I will bolt the neck onto the body.
|
(4/23/18) Left: Working on getting the neck attached to the body so that I can take a couple of photos of the full instrument. I'm fitting the retaining rings on the back so that I can get it bolted on. Right: Pickups are now getting their covers and I'll be installing these into the body and running the cables through to the control cavity and the Audere preamp. |

I test-fitted the pickups and I'm working on getting the retaining screws installed and making these part of the assembly.
|
|

These are a little awkward to copper shield but well worth the effort.
|
(4/22/18) Left: Got the pickups cavities shielded and now moving on to the control cavity for the same copper treatment. That will allow me to install pickups and preamp. Right: I have the copper shielding in the control cavity now which allows me to get started on the gounding wires and pickup installation. The pickup cavities and control cavity need to be connected as one common ground. |

Most of the copper shielding now in except for a small amount around the lid recess. I'm starting now on the wiring.
|
|

Pickup recessews and control cavity are now connected so that I can get the pickup wires run through. First I have to copper shield everything!.
|
(4/20/18) Left: I was able to drill to connect pickup recesses with the wiring holes and the control cavity so I can now get started on applying the copper shielding in those areas. (4/21/18) Right: I'm working on the control cavity - first thing is to make sure holes are the right size for the pots (some overspray) then I will install the copper shielding to insulate the whole cavity. |

Have some work to do in the control cavity to get it ready for installation of the pickups and the preamp!.
|
|

First thing this morning I was cleaning out the cavity and working on the lid to get these two pieces to fit together nice and neatly. Got that done now on to a list of other tasks to get this bass ready.
|
(4/18/18) Left: Cavity covers rarely fit after finishing and they need some TLC to clean out overspray from the cavity recess and some from around the edge of the lid. Got that job done. (4/19/18) Right: Some of the many tasks today are getting the pickup connecting holes established, grounding holes, setting up neo magnets for covers, getting overspray out of the neck joint! |

Very busy day on this bass. I want to get the neck fitted which means cleanin out some of the overspray that inevitably gets into the neck pocket. I'm also marking and drilling varios wire holes and many other small tasks.
|
|

Back of the bass has a really nice look - we left the center core section natural and rolled the black trans around the body edges and across the back.
|
(4/17/18) Left: This photo shows the back of the instrument body. The black trans tint was rolled over to the core section. It looks black in the photo but you can see the mahogany through it which I like a lot! Cavity cover matches too! Right: I went one step further on the finishing process because I had my finisher treat the pickguard and the fingerboard. Worth the extra work for durability. |

I don;t normally do this but I had the finisher treat the maple pickguard and the fingerboard to give them a better protective finish (I would normally just coat these myself). I wanted the maple to have the same protective finish and look and feel as the rest of the bass.
|
|

Just back home with the finished instrument - I like how the grain is so detailed after the black tint went on. More pics to come I just wanted to get one up here asap!.
|
(4/16/18) Left: I just got back from my finisher where I picked up this bass and brought it home. As expected the grain of the wood has a lot of detail brought out by the black trans tint!! Right: Another photo of the top and neck of the bass - I really like the textured feel of the top material with the tint on it! I will be taking more photos to highlight other areas of the finished instrument. |

Super smooth to the touch but the maple looks very textured. Lots of interesting grain happening on this bass!
|
|

Hipshot Y-tuners are the best.
|
(3/25/18) Left: I am using Hipshot tuners on this bass even though my plan was to create a more price-conscious instrument. I just could not find tuners to provide the design and quality I was looking for! (4/5/18) Right: Text and picture coming. |
Can't do better than a Hipshot Type A bridge (in my opinion).
|
|

Audere 4-band will do a great job with the Nordstrands!
|
(3/14/18) Left: This bass will have the Audere 4-band configurations with three stacked knobs. Lots of tonal control coupled with there Nordstrand pickups so it should sound great! (3/19/18) Right: Our bridge will be the Hipshot type A 5-string. It is a really good quality bridge unit, in my opinion as good as you can get in the marketplace. Will look good on the black trans tint! |

Can't do better than a Hipshot Type A bridge (in my opinion).
|
|

I feel like I have been sanding for years! Anyway I'm just about done and getting ready to bring this instrument to my finisher.
|
(3/9/18) Left: Almost all of the rough and finish sanding is done and I'm now inspecting everything prior to bringing the parts to my finsiher. (3/12/18) Right: The bass is now going to my trusted finishing expert with whom I have already discussed the details of the tint and finishing objectives. I can't wait to see it when it's done!!! |

I'm going to be driving the instrument to my finisher. Looking forward to seeing the results.
|
|

The edges take a lot of time to resolve but they are now ready for the finishing process.
|
(3/3/18) Left: I am pretty much done with the body - it is ready for finishing. There are a few curves and surfaces on the neck I want to tidy up but we are now ready for the finishing shop! (3/7/18) Right: This photo is just to show the existence of the holes drilled to retain the pickupard onto the body. It should be a very nice match for the fingerboard and good contrast with body! |

Holes have been established in the pickguard.
|
|

Body is sanded smooth on all surfaces and ready for the finishing process.
|
(2/23/18) Left: I am pretty much done with the body - it is ready for finishing. There are a few curves and surfaces on the neck I want to tidy up but we are now ready for the finishing shop! (2/27/18) Right: One of my last challenges was to get the back of the neck feeling just right so I spent some time on that area until it felt the way it should. |
Text coming..
|
|

Logo has now been added to the back of the body.
|
(2/16/18) Left: I created a Watson Guitars insert for the back of the guitar. Nice and clean because I made it on the laser. Looks good in there! (2/19/18) Right: Test fitting neck and body as we will be taking this assembly to the finisher very soon. Just want to be sure the mating parts are set correctly together and line up nice and cleanly!. |

Making sure I have a good fit between the parts, may radius the heel just a little bit more.
|
|

Ready to drill the holes that will retain the pickuard onto the body.
|
Left: Carefully plotting small holes around the pickguard so that the retaining screws will be properly spaced to keep the plate secure. Right: I decided to put the WG logo on the wenge portion of the back of the bass. Headstock is compact and needs to show offthe wood, so this was a nice area to add logo. |

I machined a recess into which I will drop a small logo plaque.
|
|
Been very busy with sanding. In the morning in daylight I always see a new area to sand!!
|
Left: The body has been sanded pretty much all over and only needs some rubbing with finer grit. I had to use rough paper to get all the radii where I wanted them. Right: The serial number tag installed into the back of the body getting cleaned up plus I am checking egde breaks all over and sanding to 150 grit. |

I have embedded the serial number tag into the center of the wenge laminate at the baqck of the body - the bass has an official identity now!.
|
|

I'm doing the hard stuff now - inside the curves where it's hard to get your fingers in there!.
|
Left: Sanding to resolve all surfaces in preparation for the finishing process. It's a lengthy process as the quality of the final finish depends on the condition of the sufaces before finishing starts. Right: Did some final work to the headstock to get that into a finished condition. This bass is going to look beautiful.! |

This headstock will have a continuous grain truss rod cover and the front face will be tinted to match the body.
|
|

Testing the component parts so that I can make adjustments.
|
Left: I bolted the neck onto the body so that I could do some of the final shaping work on the neck to get it looking and feeling right. Almost ready for finishing on this one. Right: I spent some time working on the overall contour of the back of the neck and now have it pretty close to a finished profile.. |

Almost done with neck shaping and blending heel and headstock.
|
|

BEM pickguard looks very nice on the instrument. It's still bare wood but will look great finished. Black trans body and headstock face will contrast nicely too.
|
Left: I'm test-fitting the pickguard onto the bass and it looks really nice. It's untreated right now but with coating it will match fingerboard very well. Right: I double checked my markings on the body and went ahead and pilot drilled the three control holes. Locations worked out for the cavity so drilled them full size. |

3 holes how established for the Audere Controls.
|
|

I sanded the joint face of the pick guard in order to maximize the bond - we are gluing wood to plastic so I need to make sure everything works well!.
|
Left: I'm preparing the pickguard for gluing it to the birdseye maple veneer. First step was rough sanding the joint face so that I get a really good glue bond. Right: After much gluing and cutting and filing and sanding we have a bird's eye maple pickguard. Took a surprising amount of work but looks great. |

The birdseye pickguard is now done and all I have to do is establish a few holes to attach it onto the body.
|
|

Need to alighn the layout of the control knobs to the geometry of the pickguard so it all looks right when done.
|
Left: I have marked out the footprint of the pickguard on the body so that I can plot the positions of the control knobs. Right: I ran the geometry file for the pickguard in the laser and after a few small adjustments created the support plate onto which the maple veneer will be attached. |

fter some final development work on the geometry I used the laser to cut the pickguard subtrate material. This will be used as as stable bas plate for the Birdseye Maple veneer. I chose black because we will be doing the black trans tint on the maple of the instrument top.
|
|

Cut a small slot in the wenge center laminate to house the little insert with the instrument's serial number. I'll inatall the insert right before the bass goes to finiahing.
|
Left: I decided to put the serial number in the wenge center laminate at the heel end of the body. It's always nice to get the instrument's identity permanently installed! Right: Text and picture coming. |
Marking out body for pickups and bridge.
|
|

Mahogany control cavity cover is now thicknessed and fitted in place.
|
Left: The mahogany cavity cover has now been sanded down to the correct thickness and fits nicely in its location. It will receive the same blank trans tint as the back body halves. Right: Getting some more sanding done around the body, concentrating on the edges so that the contour flows nice and smoothly. |

Working on the body egde breaks and flatness of the sides.
|
|

Headstock refinements and sanding under way.
|
Left: I have to get some shaping done to the back of the headstock to create the volute, establish final thickness and make sure tuners will fit. Right: In this photo I have cleaned up all the faces of the headstock, shaped the volute, smoothed out around the edges and broken the edges front and back. |
Marking out body for pickups and bridge.
|
|

pilot hols and retainer recesses for attaching neck have been machined.
|
Left: Four neck retaining holes and retainer recesses have been machined. Will probably leave the final drilling through till after the finishing process. Right: This is the piece of birdseye maple veneer I have been holding onto for the pickguard assembly. Great grain match for the fingerboard!. |

This BEM veneer has just the right size grain size and density to match the fingerboard.
|
|

Just making sure the neck fits the neck pocket with the right amount of space to allow for finishing buildup.
|
Left: Fitting the neck into the recess in the body. Need to leave just the right amount of space as the finish will add some thickness to the neck heel. Right: I have drilled holes in the control cavity bosses which will hold neodymium cover retaining magnets after the finishing has been applied. |

Magnet holes drilled in the control cavity.
|
|

I want to get the neck retaining holes and recesses established in the body so that I can get the neck attached.
|
Left: I cleaned up the area on the body where the neck fits into the recess. I'm setting things up to create the holes and recesses to secure neck to body. Right: I put some time into sanding the belly cut from its roughed-in stage to a nice flat sanded surface. One more manual task out of the way! |

Shaping and sanding on the belly cut is done - feels very comfortable. Moving on...
|
|

I drilled out the tuner holes and got started on the sanding on the headstock. I will be doing a little dremel work to remove glue and get the truss rod cover to sit in there nicely.
|
Left: The neck has been set up on my drill press and I have drilled out the four holes in the headstock for the tuners. Now for more sanding!. Right: I'm testing the pickguard with a template to see how it looks in real life. I'll make any adjustments and get the materials ready to put it together. |

This is my proposed shape for the pickguard (which will be birdseye maple to match fingerboard).
|
|

Marking out body for pickups and bridge.
|
Left: Whoever says that's a ridiculous amount of clamps has never tried to glue a headtstock veneer onto an angled headstock! Right: This is the neck with the headplate now attached to it. My next task here is to sand and shape around the profile to finish the shape and get it ready for drilling the tuner holes. |

Clamping the matching headstock plate onto the headstock.
|
|

This headstock overlay is from the same piece of wood as the top and will be tinted to match.
|
Left: These two components are the result of my machining. I will be gluing the headplate onto the headstock and then trimming the headstock down to finished shape and size. Right: The cavity cover was machined out of mahogany and will have the same trans black surface treatment. |

I cut out the mahogany control cavity cover on the CNC - it will get the same trans black as the back winge (up to the core section).
|
|
Few more passes with files and sanders and this will be done. I will bolt the neck onto the body for the final shaping.
|
Left: Basic neck carving being done so that I have the profile closer to finished size, shape and thickness. 4-strings need more material strength. Right: Headplate up on CNC so that i can cut out the truss rod access cover. Once that is done I can attach the cover, which is of the same wood as body top. |

Getting the little truss rod cover separated from the headstock faceplate.
|
|

Ready to cut out the Neutrik jack socket recess.
|
Left: I put the body of the instrument back up on CNC this time to get the jack socket geometry machined through to the control cavity at the optimum location. Right: Just wanted to show the Neutrik recess with my test piece fitted. I can now sand all the way round the body and clean that area up. |

The jack socket has been established and I am working my way around the body for final sanding.
|
|

I'm working on getting a mahogany cover cut for the control cavity.
|
Left: This is the wood I'm planning to use for the cavity cover on the back of the bass. Same material and good matching woodgrain!. Right: I have my headstock veneer material ready to go so I will be doing a final thickness and trim. I need to cut out the truss rod access cover and then will apply to headstock. |

Headstock veneer will match body top.
|
|

Gluing the fingerboqard onto the neck - one more big step towards completion.
|
Left: Time to bond the fingerboard onto the neck of the bass. This is always a fairly complex operation since it is such a critical step in production and postioning is critical. Right: Attachment of fingerboard to neck complete and I have done the cleanup to remove the extra adhesive that typically gets squeezed out. |
Marking out body for pickups and bridge.
|
|

Frets are in and the fingerboard is now ready for assembly onto neck.
|
Left: Frets now in - substrate removed and the edges of the fingerboard and fret ends plus side dots have all been sanded flush. Right: I have drilled a couple of alignment holes and set up all of my tooling and everything is now ready and within reach for me to glue the fingerboard onto the neck. |

All set up with fixture, rubber bands and glue to get the fingerboard glued onto the neck..
|
|

Added a couple of coats of sealer before I install the 24 frets.
|
Left: Prior to installing frets I am applying a couple more coats of sealer because it is so much easier to do before frets are installed. Right: Frets going in and still oversize so I need to trim up the ends and carefully sand them down so that they are all clean and flush with the fingerboard edges. |

Working on getting all the frets installed so that I can move on to the next operations.
|
|

Fingerboard and top woods are going to look really nice together!.
|
Left: This is a shot of the body and the fingerboard together. These two woods are going to look really nice together. Right: Side dots in and fret wire now cut to individual pieces and ready for installation. Will check fret slots for depth and prep board surface again before install. |

24 Frets have been cut and are now ready for imstallation.
|
|

This is my trusty fret wire bender which does a great job getting the wore ready for cutting and installation.
|
Left: Fretwire prepped and ready for fret installation. I have to pre-bend the wire so that it is just a little smaller radius than the board for best and tightest possible fit. Right: I am installing the side dot material along the upper edge of the fingerboard where I recently drilled the pattern of holes. |

In this photo I am gluing the side dot material into the holes drilled along the edge of the fingerboard.
|
|

Set up for machining the cavity in the back of the body.
|
Left: Body is now set up on the CNC for my machining operation to cut the control cavity and the recess for the cavity cover. Right: The control cavity and the recess for the lid have been cut. I will make a matching mahogany lid for the cavity so that we keep the continuous grain look on the back. |

The control cavity and th erecess for the lid have both been cut.
|
|

I have created a cavity and lid recess file for the control cavity which I will be machining on the back of the bass.
|
Left: This is my vector file for the cutting of the cavity on the back of the instrument. I will be reversing the geometry and writing a program. Right: I'm set up on the CNC to establish the side dots along the upper edge of the fingerboard. It's one ofthe last operations to do before board goes on neck. |

I'm carefully drilling the holes for the side dot markers along the upper edge of the fingerboard.
|
|

Getting the body perimeter cleaned up and nice and smooth.
|
Left: Edge breaks established all around the body and I will be starting the sanding process in anticipation of getting it to finishing. Right: I trimmed down the support plate for the neck so that I can get the side dots established and also have the fingerboard ready for fret installation. |

I removed all the overhanging support material to facilitate side dot work and installation of frets etc..
|
|

Marking out body for pickups and bridge.
|
Left: Work started on the belly cut on the back of the body. I have removed enough to test fit and see whet else might be needed for best possible fit. Right: I have been working on a suitable pickguard design to best fit the bass and look right on the body given that we will not have the traditional steel control plate. |

I was working on concepts for the pickguard design - this was the one that appealed to me most (at least so far!).
|
|

Marking out body for pickups and bridge.
|
Left: I have been back on the sanding machines in an effort to get the body contour completed. I'm now happy with that and ready to plan control cavity. Right: This is the back of the bass where I am currently plotting out locations for features I will need to cut or machine. I will probably do the belly cut next |

Planning belly cut, control cavity , body joint geometry and retaining screw locations.
|
|

I'm using the same material on the headstock face as I used for the top of the body.
|
Left: This is the material I kept aside to create the matching veneer on the top surface of the headstock. Getting that ready for application. Right: I got the body up on the CNC and cut out the two recesses for the pickups. Good to get that done - I can now measure up to create the control cavity on the back of the body. |

The two pickup cavities have been machined into the body.
|
|
Marking out body for pickups and bridge.
|
Left: Some final shaping going on around the body especially at the lower half of the body where I am getting ready to machine a cavity into the back. Right: The inlay on the neck has been sealed and leveled which means I can get the side dots done and then get the board attached to the neck blank! |

Fingerboard dots sealed and leveled.
|
|

Marking out body for pickups and bridge.
|
Left: I've hit the fingerboard with some sealer in order to prevent any adhesive from getting into the grain around the inlay locations. Right: Inlay has been set into the fingerboard and I have sealed up the surface area to protect everything. The black ring around the white shell has a nice visual effect. |

I'm installing white shell dots with a black border - the look nice qand stand out very well.
|
|
Marking out body for pickups and bridge.
|
Left: This photo shows the inlay that I have cut on the laser and set into the recesses I cut in the fingerboard. As soon as I have these sealed I will attach the fingerboard to the neck. Right: I spent some time on the back of the headstock finishing the shaping of the neck volute. Got is sanded down too. |

Most of the back of the headstock has now been shaped.
|
|

Starting the back of the neck by first removing some of the excess material.
|
Left: I'm doing some neck carving while I'm waiting for a chance to get the body up on the CNC machine. Right: I am on the CNC machine machining the two pickup recesses into the body for the J-Bass pickups. After these are established I will have a control cavity to machine out for the Audere package. |

The awesome pickups I got from my buddies at Nordstrand pickups. These will do a great job.
|
|

The recess for the neck has been machined into the body.
|
(3/14/17) Left: I didn't get a chance to take a photo of the body on the CNC but I was able to gt the recess for the neck cut into the body which allows me to align everything else. Right: Now that neck and body fit togther I can plot out pickup and bridge locations for subsequent machining and hole placement. |

Marking out body for pickups and bridge.
|
|

Inlat will be white shell surrounded by a very small black ring!.
|
Left: This is my fingerboard inlay prototype which is basically two shells cut in intersecting circles. I have some minor mods and will then cut all the shell for the fingerboard. Right: Body and neck being aligned as a pair so that I can calculate the overlap based on scale length. This then allows me to get the neck pocket cut. |

This is the heel end of the neck which I just machined down to its final thickness.
|
|

Recesses cut for the inlay.
|
Left: I cut fret slots plus the recesses for the inlay on the fingerboard. Per my customer's wishes I'm going to try to do circles with a concentric ring on each. Right: I machined the heel end of the neck down to its final thickness so that I can start shaping the back of the neck. Hope to get fingerboard on soon. |

This is the heel end of the neck which I just machined down to its final thickness.
|
|

Machining fingerboard profile.
|
Left: Machining has been started on the fingerboard. Right now cutting it to its final shape to match the profile of the neck. Right: The compound radius of the fingerboard has been generated on the top surface and in doing so I also established the thickness of the fingerboard. Will sand to remove machining marks. |

The compound radius has been completed - now fret slots!.
|
|

Fingerboard ready for CNC.
|
The fingerboard has now been rough cut and attached to a suitable substrate material to keep it staple while we machine it to its finished profile, add the compound radius, nut and fret slots and inlay features. I'm just waiting for some free time on the CNC machine and this fingerboard will be up there getting everything cut and established. This should end up being a nice looking fingerboard. Hoping neck will be ready at the same time! |
|

Preparing fingerboard for machining.
|
Getting work started on the fingerboard of this bass. I'm marking out the critical ponts on the board so that I can determine where the 12th and 24th frets will be and how much to leave for the nut area. Also choosing which way round to use the maple to get the best out of the grain structure. Once it's marked out I will rough saw the blank and get it attached yto a solid substrate for machining. Will start cutting the board right after that. |
|

Body has been roughed to close to template size - now sanding edges.
|
The body has been rough ground down to very close to the finished body profile and I am now cleaning that up on the spindle sander. Once the body is close enough to finished shape I will be cutting the cavities required for the electronics and batteries which, in the case of this bass, will be in the back of the instrument as we will not be using the traditional J-Bass control plate. After that I'll be able to machine the neck pocket etc. |
|

Birds eye maple for the fingerboard.
|
I got hold of this piece of Birds Eye Maple for the fingerboard which I think should work quite well. I got it from a local wood supplier and I need to get it slightly further sanded down before I start machining it. I will run it through my sdrum sanded for thickness and then get it attached to some MDF as a baseplate. Then it will be able to go up on the CNC machine for a number of machining operations including the inlay. |
|

Assembled body being cleaned up on the spindle sander.
|
This is the body of the instrument after the top was glued on. I'm now going to do some cleanup around the perimeter to get the shape back down to something close to the final template size. Once that is done, I will focus on the neck pocket first because that in turn will define the location of the bridge and most of the other features on the top and back of the bass body. I now need to get back to the neck and get that completed. |
|

Body and decorative top being glued together in the vacuum press.
|
The body is now in the vacuum press being clamped and glued to the curly maple top plate. I will be leaving this alone for a while to make sure ithe adhesive has completely hardened. At that point I will remove he assembly and cut off the excess material to get to a point where I can then do sme sanding to blend the material to a common edge condition. I will then get my body template, mark out finished perimeter and sand to finish. |
|

Wiring slots in the body have been machined.
|
I set the instrument body up on my machine and cut three carefully placed slots which will ultimately hold the wires for the two pickups and the grounding for the bridge as they all connect to the control cavity which I will cut later. I can now get this body blank off the machine and set things up to glue the top plate on! We are definitely getting closer to having a real bass to work with rather than just component parts! |
|

Laying out features for the body of the bass.
|
In this photo I am laying out the locations for the end of the neck and fingerboard, the bridge, the two pickup loctaions and also the location of the control cavity. Once these are established I will be cutting a few channels in the top which will serve as wiring channels after the top has been secured on. Once those wiring channels are in the top plate goes on and I clean everything up. Have some more work to do on the neck now! |
|

Getting ready to glue the top plate halves together.
|
This is the clamping setup to secure the two top plate halves together while the adhesive does its work. The wood grain is very nice and should look awesome once the tint and finish has been applied. Once this is completely set and unclamped I will get it sanded and prepared for gluing onto the body itself. I may cut wiring channels into the top of the body first to create wiring channels under the top. |
|

Getting ready to glue the top plate halves together.
|
The maple plates for the top are being prepared for gluing together into one bookmatched piece. I left the outer edges straight so that lateral clamping would hopefully be easier. I want to get this top onto the body quickly so that I can get to work shaping the body and getting the required recesses and cavities cut. I was as economical as possible and I think there is enough off-cut from the top material to cover the headstock too! |
|

Machining joint faces on the maple top material to prep for assembly.
|
In this photo I have the two bookmatched halves of the curly maple top secured on the CNC table so that I can machine nice clean center joint faces for gluing the two top halves together. The figure in this wood is really nice and should look very impressive with our black tint that we are planning to apply. I'm anxious to get it cut and secured onto the body as that will allow me to get all the remaining body features completed. |
|

Body assembly completed - it's a nice match to the neck!.
|
Second mahogany body half has been attached and I now have a complete body blank to work with. I will now be using my template to mark out the finished body profile and removing material to get that outside shape finished up. I have some material that my customer and I selected as a candidate for a bookmatched figured maple top and I will be getting that material ready for assembly. Also more work on the neck itself! |
|

Cutting joint faces on the body halves.
|
I am now machining the two joint faces of the mahogany body halves so that they are level, square and correctly positioned for gluing onto the other pieces. Once I have them both cleaned up and verified on my template I will go ahead and glue two onto the core piece and create my complete body blank for the bass. Following that will be some cleanup to create black and front surfaces then we will get ready to apply a top plate. |
|

Cleaning up the assembled center section.
|
In this photo I have the 3-piece center section on the CNC for a quick surfacing operation to generate a flat and square top surface. After this I will move to the drum sander and clean up both top and bottom so that the two surfaces are parallel and square to the sides. This piece will then be ready to have the mahogany body halves attached. We will soon have something that looks a lot like our J-Bass objective! |
|

Gluing the three pieces of wood for the center of the body.
|
I am now gluing the three pieces of wood together that will be the center of the body assembly. Once this assembly has set I will clean it up to a similar thickness to the mahogany body halves. I then need to get the two body halves onto a machine to cut the joint faces so that everything can be glued together to create the entire body assembly. Once that's done I'll surface the top and bottom and go back to the template for final shaping. |
|

Neck ready for final shaping.
|
The neck has been further shaped and I have also cleaned up the excess glue on the top of the neck where the carbon fiber rods were installed. I wanted to hold off on establishing the heel thickness until I had a physical body thickness to relate it to. I will be setting up my machine to trim off the material at the bask end of the neck so that we have finished heel dimesions for fitting to the neck pocket in the body. |
|

Body components being prepared.
|
This is the body with the components roughed out. I have rough cut and sanded the upper and lower body halves and my next move will be to sand joint surfaces on the maple and wenge and get that assembled. Once I have a glued up body I will machine and sand to prepare it for a maple top. When the top has been added I will be cuttig neck pocket and recess for controls. It's going to be a good looking bass. |
|

I'm using some very old mahogany for the body wings and highlighting it with a maple/wenge center.
|
Although I had planned to make a purely mahogany body I happened to have some old-growth mahogany at hand and also wenge and maple from the neck construction. It might qualify as a small upgrade but it helps me use this nice material and we will be able to have a little artistic continuity from the neck through the body. The body will still be mostly mahogany and this combination will look awesome with our decorative top!!! |
|

Carbon fiber rods have been glued into the slots on the top of the neck surface.
|
I fitted the carbon fiber rods into their respective slots and got them seciured into the neck using a very high grade expoxy. This makes them truly an integral part of the neck construction and they add a significant amount of strength and stability to the assembly. When the glue has completely set I will clean up the top surface and resume work on the neck. Now that the rods are inset the neck is ready for a fingerboard! |
|

Neck has been machined, trimmed and headstock rough sawn.
|
Neck machining has been done! After the truss rod work I had to machine a pair of slots that will be housing two carbon fiber support rods. That went fine and the neck has been cleaned up, extra material has been sawn off and I have marked and rough sawn around the profile of the headstock. Now I will cut and fit the carbon fiber rods, mix a batch of special epoxy and get the two rods securely glued into the two machined slots. |
|

Setting parameters for the truss rod slot to be cut into the neck.
|
Next job here is to get a truss rod slot established. I use very high end truss rods but they have three different diameters at the head end and therefore I have to cut the slot with corresponding geometry so that everything fits the way it should. The pencil marks on the neck indicate where these different diameters need to start. Despite the extra work these rods are the best I have ever used and it's worth the custom fitting! |
|

Headstock angle is cut and top surface cleaned up.
|
In this photo I have the CNC generating an angle for the headstock of the instrument. It's a much more accurate method than trying to saw and flatten the surface and it keeps the headstock on exactly the same plane as the surface of the neck and fingerboard. When I am done here and have removed the neck from the fixture I will use my headstock template to mark out and rough cut the headstock geometry. |
|

Neck blank on the CNC.
|
I have the neck blank set up on the CNC machine so that I can get started on establishing some of the critical machined features of the neck. I will be machining the top surface of the neck, then cutting the headstock angle. After that I will machine the neck to its final width and length. Lastly - I will machine the truss slot geometry and two slots for carbon fiber re-inforcing rods. I will be posting more photos soon! |
|

Gluing maple extensions for headstock.
|
Before I get this neck up on the CNC machine I needed to add a couple of pieces to the headstock area to allow for its widest part. Once this is glued I will be putting the assembly up on the machine to cut the top surface, headstock angle, neck profile, and truss rod and carbon fiber channels. I am looking for a suitable fingerboard material and I'm under way with the Mahogany body. Looking forward to this one taking shape! |
|

Getting started on gluing the neck together.
|
I have been sanding the three laminates to get nice flat surfaces on each piece and now I can start gluing them together. In this photo I am gluing the center piece of Wenge to one of the outer Curly Maple pieces. I have everything ready to continue on and have the third piece assembled and we will have most of a neck assembly complete. I will probably need to attach a couple of curly maple pieces to add space for the headstock profile. |
|

I now have all three neck laminates cut to the template shape.
|
I got the third neck laminate cut out of some Wenge material and I am now able to get the neck part of the instrument moving ahead top the next operation which will involve gluing the pieces together into one neck blank. I will have to add a couple of matching pieces of maple to the headstock end just to give me the little extra width that will be required by the headstock. I think we will see this bass moving along quite quickly. |
|

Two of the three neck components rough cut and ready for the next step.
|
I have now cut the two main pieces for the neck from some very nice curly maple. I will cut a third wenge piece so that I have all the neck components on hand so that I can get them glued together. I have also looked out some nice mahogany for the body of the bass so I will get that rolling very soon also. This bass will be defined by its top, how we do the inlay and the tint we choose to bring the best out of the selected top wood! |
|
Some of the woods I will be using.
|
These are my woods for the neck pieces and the selection of woods I expect to be using to create this bass. The body is going to be mahogany for a more traditional tone and I will be using Curly Maple and Wenge for the neck section which will yield a nice strong and rigid neck. I will be using a nice figured maple top that will really work well with the dark transluscent tint we have discussed so it will be a good looking bass. |
|

A lucky score at the hardwoods store - some Curly Maple perfect for this project.
|
I was shoppping for various woods today at my two local suppliers. While looking in the second hardwood store I happened to notice a really curly maple plank that not only had an obvious and consistent curly grain, but was thicker than the typical stock material I'm accustomed to seeing at wood suppliers. I grabbed all 10 feet of the plank mainly for this project although it might yield more that that. Anyway - good get for neck material!!! |
|

A nice higjly figured piece of bookmatched Curly Maple - nice stuff and would look great - a little thinner than I mormally use but would still look awesome. We will see.
|
We are still in the process of selecting the package of wood from which to build this bass. I believe there will be some Maple in the neck, possibly with a center laminate of something else. I had this Curly Maple top set in the shop which has a really nice grain, and we are looking at this for a candidate for the top plate. Other options may come up too. I am going through my inventory and will update this page very soon. |