|

This picture shows the detail of the Maple and Iroko laminates in the neck.
|
Since we didn't have a lot of photos of the back of this instrument we decided to take some today. The two photos highlight the Maple and Iroko body core, the Honduras Mahogany backand the overall shape of the back of the instrument. The control cavity cover and the batter cover are attached with magnets. |

Full length shot of the back of the instrument.
|
|

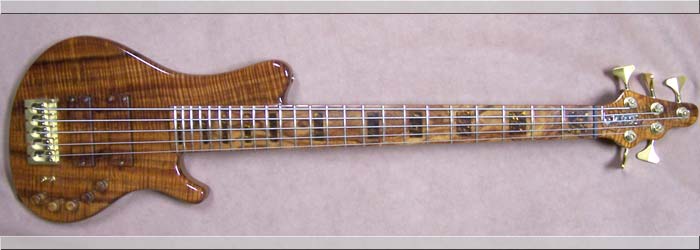
Bass is now complete "with knobs on" and wired for sound.
|
We have completed the assembly of the bass. It has also been fitted with our own Watson 3-band preamp and with the final addition of the Koa knobs it's pretty much ready to play. Sound great - we are very happy with the low-B response with the 33" scale length. Great tonal reange and very comfortable to play. |

End view showing the really nice Koa grain. The hardware is stain gold.
|
|

A nice shot highlighting the Koa top and pau Rosa fingerboard together.
|
This photo shows the complimentary colors of the Koa top and the Pau Rosa fingerboard. The two woods work very well together and really unify the instrument. You can also see the Root Beer Paua Shell inlays in this shot. From a distance they look dark but closer up they have an amazing color and depth. Something you have to see to appreciate! Next up for this bass is copper shielding foil in the cavities. |
|

The Koa top came out beautiful after the Polyester resin finish.
|
We have now applied Polyester Resin coating to this instrument and it really brings out the beauty of the grain in the Koa top. There's actually a lot more figure and color in this piece of Koa than we expected before finishing. The color of the Koa is also a great match for the Pau Rosa wood we used for the fingerboard. Now the bench work starts as we have a lot of prep to do to the fingerboard and post finish cleanup before assembly. |
|

This is a shot of the back of the bass showing the transition between the body and the neck.
|
This photo shows the carving that we do on a single cut bass in the transition area between the neck and the body. It has to feel comfortable and also allow for the positioning of the player's hand so that all the top frets can be easily reached. I usually keep carving this area until it feels right, since every instrument is subtly different. The laminates and their accent veneers always look nice in this area. |
|

After much trial and error we have developed a system to inlay this beautiful colored shell into our fingerboards.
|
The fret slots have been cut into the fingerboard and we have also cut the slot for the nut. Next task was to cut recesses for each of the inlay pieces. Our challenge on this bass is to inlay special 'root-beer colored' Paua Shell fit into the fingerboard. The material is very fragile and we had to develop a special method to achieve success in inlaying the material around the compound radius of the fingerboard. |
|

This photo gives us a glimpse of the very interesting wood grain on the fingerboard. The wood is Pau Rosa from South America.
|
Here we can see the very attractive piece of Pau Rosa we are using for the fingerboard on this bass. I have cut the compound radius on the CNC and now we are ready to cut in the fret slots. This fingerboard will end up being a little bit darker once the material absorbs some UV and gets a coat of Tung Oil, but that will actually create a close to perfect match to the Koa top when we're done. I have yet to decide on the best inlay for this fingerboard. |
|

Here's a view of the back of the bass now that we have the battery and control cavities machined.
|
We just finished machining two major features of this bass. The 18-volt battery cavity and the control cavity. In the process of machining both of these cavities we also cut the recesses for the matching wood covers that will be used in these two locations. Now we have to concentrate on the fingerboard in order to complete the assembly of the instrument. We also have final shaping to do plus the Koa veneer on the headstock. |
|

We added a little Naptha to the woods for a preview of how this bass might look when completed. Obviously this is a very rough mock-up but it gives us an idea how the woods will look.
|
Just for fun we decided to take a photo of this bass with the bridge in place and a little Naptha on the wood to see what it might look like when finished. bear in mind we might add some subtle tinting to the materials but at least we can see how the various woods combine. The Pau Rose on the fingerboard will come out a little darker after we apply Tung oil, but with its gold frets this bass will look quite spectacular!! |
|

This is the Pau Rosa fingerboard which will be going onto this bass. The colors will work well with the Koa top.
|
I have now selected some wood for the fingerboard of this bass. The material is a hardwood from Brazil called Pau Rosa. It has a gold/red coloring which through exposure to light will tone down to something very similar to the golden brown of the Koa. I think it will be an impressive match for the rest of the intsrument. I'm getting ready to machine the profile of the fingerboard and also get started on cutting the compound radius. |
|

The Koa top has been glued onto the rest of the body. It's always nice to get an instrument to this stage as you only have to deal with one piece.
|
As you can see in the photo to the left, we have cut out the pieces of the top wood which we will use as pickup covers, and have now glued the Koa top onto the rest of the instrument. The body will need some final shaping and we will then move on to cutting the battery and control cavity chambers. We also need to start working on the fingerboard. I have a few options so I will have to make a decision on what material to use! |
|

In this operation we are cutting out the joint between the Koa top and the end of the neck. We will also cut out the pickup covers in the same operation.
|
Now that we have machined the top face of the body and the channels for the wiring, we can start planning to glue the Koa top onto the rest of the instrument. In order to achieve this I have to machine a very accurate cutout into which the end of the neck joint will fit. In the photo you can see that cutout. Before I break down this setup I will also cut out the two pickup cover pieces from the Koa and keep them aside for the matching pickup covers. |
|

Sides are on and we have cleaned up the back surface ready for its contriol and battery cavities..
|
Both Mahogany body halves have now been glued onto the core of the bass. They are most often glued on in separate setups because the alignment of each piece is fairly critical. I then secured the assembled unit to a machine table and machined off the excess wood to completely clean up the back surface. I can now use this surface as a datum for further operations. Next up we will machine the top surface to prep it for the Koa top. |
|

Here we are gluing the lower half of the body onto the center core of the bass.
|
Today we were able to get the accent veneers glued onto the body halves and also get the lower bout of the bass body glued onto the laminated core section. This will create two contrasting veneer pinstripes between the core section and each body half. Tomorrow we will glue and clamp the upper bout in place and we will have something that actually resembles a bass guitar! Following that we need to do some cleanup on the CNC. |
|

The neck for this bass is in the foreground although I glued up all the Carbon Fiber rods for all 3 current basses in one batch.
|
The neck has been machined and now it's time to get those Carbon Fiber rods glued into the slots. As you can see from the photo, I decided to glue all six CF rods into the three necks I currently have in the shop. This is easier for me as I only have to cook up one batch of epoxy to do everything. The down side is that I end up using just about every small clamp I have in the shop! These will cure overnight and I will cleanup the surfaces tomorrow. |
|

The core of this bass is now up on the CNC for some machining operations. This is where we clean everything up and get it ready for assembly with body parts.
|
The core of the bass is now glued up and ready for machining. I clamp the core in two machine vises on the CNC and make sure everything is square and as level as possible. Then I machine the top surface of the neck until it completely cleans up. This becomes my datum surface for all the other machining done to this assembly. In the photo, you can see that I have machined the neck joint face, the headstock angle and the neck perimeter is being cut. |
|

This photo shows the final seven laminates that make up the core of the instrument. We were surprised at how light the assembly was, even at this early stage!
|
We have completed all the gluing of the various laminates to create the 'core' of the instrument. One thing that surprised me was how light this assembly of Iroko and Maple worked out. I expect this bass to weigh in at around 9lbs or less. The edges are still a bit rough but that will be taken care of when we mount this block of 7 laminates up on the CNC and start machining off the unwated material. Things should start moving quickly now! |
|

This is one of the reasons luthiers have to own a lot of clamps. Long sections like this need to have the claming pressure evenly distributed so that we end up with a nice invisible glue joint.
|
Finally we are done with gluing veneers onto laminates and we can get down to the real work of building the neck/body core. I start with two laminates near the center of the instrument and carefully glue and align them together. I slowly add a few clamps until the glue binds, then add more along the entire length for an evenly distributed clamping pressure. All this has to be done on a flat surface so that the glued set cures in a nice straight line! |
|

All the Maple and Iroko laminates have now been veneered. We're now ready to get started on the kob of gluing them all together.
|
This photo shows the combinations of laminate woods (Maple and Iroko) and the contrasting light and dark veneers which will add a nice pinstriping effect on the finished neck. We are now ready to start gluing these tapered laminates together to create the core section of the instrument. I normally start at the center laminate strip and progressively glue laminates together from the center out in order to avoid any distortion along the length. |
|

Two Iroko neck laminates in the vacuum press. They are being glued onto a white veneer. Once that's done they get the same veneer on the other side.
|
The Iroko material has been sawn up into rough blanks for the core of the bass. Those blanks were then sanded smooth on both sides. We then secured the blanks to the table of the ornamental mill and carefully cut each one to a pre-determined taper. When the five neck laminates are put together, these laminates combine to create a composite taper which is equal to the natural taper of the bass neck. Here we are gluing white veneer onto the Iroko blanks. |
|

This shot shows the rough components of the bass. Koa top, mahogany backs, and Iroko and Maple neck-thru.
|
We're getting this bass started with the basic bits and pieces. The Koa top was something I had planned for a bass last year and never got round to using, so it will make a very attractive decorative top for this bass. The neck-through section will be laminates of Iroko and Maple, both woods being quite light in weight. This will be a shorter-scale bass at 33" - a very comfortable size to play. It will also have some new features for our '08 basses. |