|

The instrument is about as protected from handling and shipping as possible. It's going by FedEx and it's insured so I think we will be OK.
|
Left: Lots of packing in the actual shipping box since you can't over-protect something like this. I'm sealing up the box and contents and looks like I will ship within 24hrs! Right: Instrument packed and sealed and ready to travel. I was very careful to do several layers of protection since this bass is traveling internationally! |

All the packing is done and I will get this to the shipping company as soon as possible.
|
|

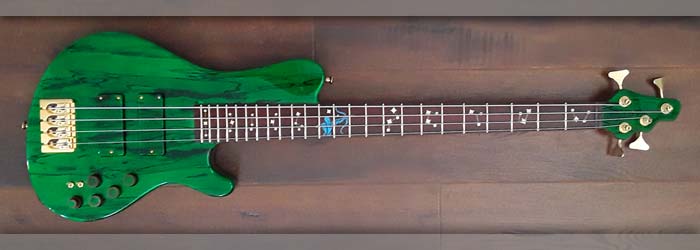
Just posting a few more photos as I take them. Nice looking bass and it will soon meet its sister!.
|
Left: Another pic of the bass in its final moments on the bench as I was getting it ready for packing. I will post some final photos as I get time - should be ready to go later today. Right: Bass has been sound tested and now I am packing it in its case with extra protection to give it the best chance of surviving its journey safely. |

These Protec cases and VERY good so I know the bass will be well protected. I added some protective material between the loosened strings and the fingerboard and packed lightweight airbags everywhere else.
|
|

Getting ready to take some final glamour photos of this bass and get it safely packed in its case and shipping box!
|
Left: Back of the bass is looking nice and complete with the two covers attached. They are held onto the body with neo-magnets so you don't see any ugly screw heads on the back! Right: The Saggitarius theme on the bass looks good and I'm glad we added those details. Testing tonight on a full bass rig to make sure electronics are all good! |

The whole fingerboard consists of little selected parts of the Saggitarius constellation.
|
|

I added some carbon fiber support to the two covers because wood cover material should be stabilized against climatic effects. Since this bass is travelling so far I wanted to build that safety in!.
|
Left: This is just me being cautious - added some carbon fiber to the lids for stability since this bass is changing climates. Lots of little final details but ready to ship! Right: Have the bass, the case and the shipping box all ready for shipping - this will give me a final weight (with protective materials inside case and box!) |

Getting the instrument ready for shipping which means first packing it in its case with protective materials, then packing the case into the box with more protective materials.
|
|

Working on final finishing and cleanup. Will string her up and test through and amp to make sure everything is still working as it should. After that I wasn to get it sefely installed in its case and packed and boxed ready for shipping.
|
Left: Working on the final details. I'm adding a second coat of wood conditioner to the fingerboard. After that I will clean all the surfaces and re-string. Then test through an amplifier to make sure electronics are all ok! Right: Getting some final cleanup dne on the back of the bass also. Will be fitting the two covers to wrap things up. |

Making sure everything on the back is nice and clean and I will fit the two back covers and test this instrument out.
|
|

The two strap buttons are now on the body of the bass. The remaining work is just adding the set of custom knobs, double-checking the overall setup and a final polish/cleanup.
|
Left: Got the two strap buttons attached to the body of the bass front and back. Looking nice! Now working on the installation of the set of custom knobs. Right: Got the custom knobs attached and installed onto the body - nice match to the color scheme and looks very nice. I'm down to some basic cleanups and final testing!!! |

Got the custom color-co-ordinated knobs installed onto the instrument. I'm going to do some testing of everything and adjust what I need to - then look at the safest shipping/packaging so that this bass can get on its way to it's owner!
|
|

Applying wood conditioner to bring out the color and grain of the wood. Really makes a difference as you can see in the photo!
|
Left: Now adding the wood conditoner to the fingerboard. It goes on glossy but absorbs in to a nice satin finish It really brings out the wood colors well! Right: Strings back on and I am getting the strap buttons installed on the body and also have to get the custom knobs fitted! Getting very close to completion here!! |

I have to add a strap button in the two standard positions on the body. I'm also using special washers to prevent damage to the finish.
|
|

Fret leveling is a part of the overall setup of the neck and action. I need to be sure all the frets are on the same level in relation to the strings as part of the overall setup process involving nut slots, truss rod adjustment and saddle heights.
|
Left: I'm now doing the first pass on making sure the frets are level. They will be lightly buffed with fine sandpaper of a flat surface then polished to re-finish. Right: Now doing the final dressing and polishing of the frets. Once that's done I will clean up and apply wood conditioner to the fingerboard to bring out the natural colors. |

Got most of the fret dressing work done and now polishing the end results. After cleanup I will condition the fingerboard wood.
|
|

Great to have the bass case ready and waiting while I do the last adjustments to the instrument itself!
|
Left: Good news - I got the awesome Protec Contego case for this bass today. This case will provide great protection while being compact and relatively light-weight too! Right: Working on the nut to achieve the optimum string heights and will be adjusting truss rod and bridge saddles to get everything playing comfortably! |

Working on the nut slots and will then get the truss rod and bridge saddles adjusted.
|
|

Initial wiring didn't work and I discovered it was due to the need for isolated grounding! All good now so I can start workig on the wiring cleanup!!!
|
Left: OK - the two coil splitting switches gave me some trouble but I discovered that the preamp grounding needed to be separate from the common grounding. Now works as I had been hoping for! Right: Time for a Case for this bass - I will be going to Protec very soon to pick one up! They are about an hour from where I am. |

I have been using Protec cases almost since I started building instruments. Very happy with their product!!
|
|

Bass looks much more finished with a set of strings on it! I need to get back inside the cavity to connect up the coil tapping switches and wiring bust should be able to test soon!!
|
Left: Check this out! Our bass now has strings on it and can make notes! I will need to make the normal adjustments, but great to see it coming alive like this! Back to electronics! Right: I'm now working on the coil splitting switches and some of the general grounding in the cavity. After that I neeed to tidy up the wiring! |

Working on getting the two coil tapping switches connected and installed into the control cavity. I will do some testing and if all is good I will tidy up all of the wiring!!
|
|

More wiring done - I'm down to coil tap switches and grounding wires!.
|
Left: Moving along - I have the preamp wired in, also the output socket. I just have to now wire up the two coil tapping switches and finish the common ground connections. Right: Can't finish some of the electronic stuff till I get the strings on so I am installing the string ferrules on the back of the instrument. |

I want to get the strings on the bass so that I can test the electronics. Have to get the string ferrules on the back installed first.
|
|

I needed to set up the best order for the various pots so that I can get the wiring organized in the most efficient ways. I'm going to get each of the pots installed so that I can tidy up the preamp wiring and then move on to the remaining electronics and power supply.
|
Left: I'm installing the Preamp next because there are so many wires to organize. The layout will be Volume, Balance, Hi-Mid, Lo-Mid, Treble/bass. Right: Making progress in the control cavity - preamp and potentiometers are in and I will move on to connecting power supply and hooking pickups up to coil tapping switches. |

Things looking more organized in the control cavity. Preamp is installed and I'm connecting some of the other electronics together.
|
|

I had to test all the wiring to isolate the four individual pickup coils.
|
Left: Before I make the electronic connections to the hardware I had to test the wiring to identify the individual pickup coils. That done, I can move on to the internal wiring! Right: Now working on getting the preamp and pots installed and connecting all the wires to make everything work! Getting there.... |

text coming.
|
|

Just about to install all the electronics and get everything wired up in the control cavity.
|
Left: Ready to get the electronics back into the control cavity and wire up for sound. Finishing up dressing frets and will remove protective tape and apply wood conditioner to fingerboard. Right: The battery compartment is now wired for an 18v power supply to the preamp system. I will be installing the Audere preamp next. |

First step in the wiring up procedure was to install battery connections to allow an 18v power supply for the preamp system.
|
|

Nut has been cut and shaped and I'm getting ready to install it in the nut slot after which I will cut the string slots.
|
Left: Got the nut blank almost complete - doing some careful fitting and then I will glue it in place and get the string slots established. Right: I'm busy right now establishing the four string slots in the nut to the right widths and depths. Once that's done I can put on the strings and do more testing and setup. |

I file the nut slots tpo a safe depth and will finish them when the bass is strung up.
|
|

Pickup assemblies are now mounted in the body. I have to make a nut now so that I can get strings on this bass.
|
Left: I got the pickups back into the body and set for height. The continuous grain covers really look great on this bass. Next task is making and installing a nut on the end of the fingerboard. Right: I mounted the Hipshot tuners onto the headstock and I'm now in the process of cutting and mounting a nut on the end of the fingerboard. |

I'm making a dedicated nut for this bass and will be installing it into the neck soon.
|
|

Put the Hipshot bridge back on and I will also re-install the pickups. At that point I can put strings on and test the overall settings and alignment.
|
Left: Bridge is now re-grounded and re-attached to the body and everything looks good so far! I'm also working on the fingerboard surface. Pickups will go in next. Right: I am now installing the two pickups into the instrument body. I have to feed the wires through carefully and install the height adjustment screws and spacers. |

I want to get the two pickups back in and set for height so that I can get a test set of strings on the bass and get the neck and bridge adjustments done.
|
|

I took the bass to my finisher today to tidy up edges along the new fingerboard and just make it look good so I could get the rest of the finishing work done!.
|
Left: I was able to drive up to my finisher today and drop this bass off so that he and his staff can do some beautiful cosmetic finishing work and allow me to get this monster completed! Right: My finisher told me he was ready with this bass so I went and picked it up today. He did a beautiful job finishing areas I has worked on! |

Bass is now back in my hands in beautiful shape. My finisher did a very nice job cleaning up areas along the fingerboard that I had to work on! Now I can get it all wired up and tested!!.
|
|

Finishing up the revised neck and checking everything. Will probably have my finisher do some cosmetic cleanup on areas I had to work on but all looks good.
|
Left: I made a few adjustments to the angular settings between the neck and the body to bring the alignment between bridge and string height above fingerboard to a better relationship. Right: After some general cosmetic work on the fingerboard I am going to bring the bass to my finisher for a final cleanup and polish. |

Now that most of the fingerboard work has been done I'm taking the bass to my finisher so he can check it out and polish along the edges of the fingerboard for me.
|
|

Working on nut so that I can get the strings on the instrument.
|
Left: Got nut slots done, and now that pickups are in, I can test the instrument with some strings on to see how it all comes together mechanically! Right: OK - upon setting up the bridge and nut with strings on the bass I discovered that I was having to adjust the bridge too high to achieve a good playing setup. May have to make some changes... |

The saddles in the bridge had to be adjusted too high to achieve a good playing action, but doing this not only maxxes out the bridge travel, but restricts future adjustments, causes the pickups to sit a little too high, and just looks a bit strange. I have a couple of options to resolve this - will update.
|
|

Installing the pickup assemblies. Should go smoothly although I have to be careful about the vertical space required for four cables from each pickup unit because of the coil splitting.
|
Left: Getting the pickups installed - they are going to look really nice on the instrument with their continuous grain covers! Will have them both in there soon! Right: I had to take the two outer tuners off the headstock to be able to safely finish the slots in the nut. I'll put strings on the bass to allow me to set the final depths. |

Didn't want to damage the tuners while filing the nut slots so I removed them temporarily.
|
|

Knobs were quite a lot of work but I am seeing the light at the end of the tunnel! I think they will look great!.
|
Left: The fancy knobs are almost done - I just have to seal the tops and clean up the finish and they'll be ready to use! They are a great color match to the rest of the top. Right: Text and picture coming! Right: Now looking at the installation of the electronics. Firstly making sure it all fits. Probably install the two pickups next. |

Testing the Audere system to make sure they all fit and I can work out a wiring distribution plan! Pickups will have 8 extra wires so I probably need to get those installed first.
|
|

Working on getting the nut blank securely placed in the nut slot and shaped to blend with neck width and fingerboard radius!
|
Left: Now working on installing the nut and getting the string slots cut into it. Getting much closer to the finished product here! Can't wait! Right: I installed the two switches for pickup coil tapping and I'm getting ready to cut and install green shell tops on the five control knobs after which I will apply a sealer finish. |

Getting started on the install of the electronic hardware and also getting ready to finish up the five wood knobs.
|
|

Working on the installation of the bobbins and making sure I have clearance for the wiring that has to pass through to the control cavity.
|
Left: Next task is to get the two sets of pickup bobbins securely installed in their respective covers. I need to dremel a couple of areas to achieve the right fit but should have this done soon! Right: It was a LOT of work to get the bobbins and wires into the covers and make everything fit. I will now seal them in there! |

I expected this process to be a little tricky - there's not much adjustment room and everything has to fit in there perfectly!
|
|

Working on adding the Hipshot bridge. Needs careful alingnment with the neck!
|
Left: I'm now working on getting the bridge accurately placed and grounded and attached to the body. Once I get the bridge ground run I can install Audere electronics. Right: The Hipshot bridge is now grounded and installed onto the body. I also installed the Neutrik output jack socket into the side of the body. |

Two more tasks completed - bridge is on and the output jack assembly is installed
|
|

Got the Hipshot tuners installed in the headstock. Moving on to getting the nut installed and set up in the neck and then getting the bridge grounded and installed.
|
Left: The tuners have now been attached to the headstock and I am now working on string ferrules for the back and also installing the nut into the neck. Right: Planning on getting the knobs finished up - have to check their heights against the lengths of the preamp controls. Looks good so will get these finished up asap! |

Did a test install with the preamp hardware to verify fit between my knobs and the preamp shafts they fit on.
|
|

Using the CNC to accurately cut a little recess to set the pickup switches at the right height.
|
Left: In order to cut out a little recess for the two pickup switches I have to set the instrument up on the CNC. Once this is done I will be able to complete the copper shielding in the control cavity. Right: Got the recess for the two switches machined and I then moved on to getting started on the control cavity copper shielding. |

Working on the shielding inside the control cavity. When this is done I can get some of the grounding wires and connections established.
|
|

Fingers crossed on the set of knobs - so far so good. Now need to separate them from the parent material and cut them to the right heights.
|
Left: More progress on the set of knobs. Hoping that these will all come out the way I want them to! They will be getting green shell inlay when they are all done! Right: I sealed the battery recess and now have to add magnets and finish up the battery cover recess. Got the magnets installed around the control cavity! |

Lots of work getting the battery cavity and the control cavity ready. Control cavity will need to be lined with copper shielding but first I need to make a small recess for the two split coil switches.
|
|

Got the copper shielding applied to the insides of the pickup cavities.
|
Left: I was able to get the copper shielding installed inside the two pickup cavitiesso that's one more task off the list! I have to do the same thing with the control cavity on the back. Right: Ready to finish the fingerboard and at the same time I am fitting the preamp and continuing work on creating the set of wooden knobs. |

I'm cleaning out the holes to suit the Audere preamp and also getting ready to machine the rest of the control knobs. I think they will work out - will know soon.
|
|

Setting up for wooden knobs on the CNC - will update on progress and success.
|
Left: I have some material that matched the fingerboard up on the CNC and I am programming both types of knob. This should give me the regular knobs plus the one concentric stacked pair. Right: I machined part of the lower half of the 2-piece stacked knob since that one would likely prove to be the most complicated - we will see. |

Machining to this stage wasn't too bad. The also need to be machined on the other side and holding them will be a challenge.
|
|

I no longer have a lathe to make things like knobs but I have a feeling I could convince my CNC machine to generate a set of knobs, one of which has to be stacked! More on this very soon!
|
Left: After searching for custom wood knobs and not really finding anything close to what we have in mind I decided the only way to achieve this was to make them. Right: I'm now working on the installation of the 4 gold tuners. Also have a nut that I am working on and I will install in the neck slot as soon as possible! |

Doing several tasks all at one one time - getting the truss rod cover to fit - installing tuners, getting a nut fitted into the neck.
|
|

In a transparent tint finish the buildup is slightly thicker because there is a clear coat applied first followed by a transparent color. I've been carefully removing material from both the cavity recesses and the lids themselves to get them to fit neatly in place!.
|
Left: Took quite a lot of work to get the two back covers fitted because of the finish buildup but most of the work is done now. Some sanding required then the application of copper shielding! Right: Looks pretty scary right now but I have to remove most of the overspray from pickup recesses bcause I can't from pickup covers! |

A lot of grinding and messy dust but the end results will be beautiful! The pickups now fit in the body and the cavities will get copper shielding applied to the surfaces.
|
|

I'm working inside the cavity areas to get the covers to fit nicely and when that's done I will add shielding to the internal cavity surfaces.
|
Left: Now removing a few areas of overspray and at the same time getting the covers to fit. I will re-finish the surfaces behind the covers. Right: I am now very busy getting pickups and other hardware fitted to the body. Tuners should be on very soon and I'm getting a ground connection established under the bridge. |

Working on getting the pickups fitted into their recesses and adding a ground connection from the bridge through to the control cavity.
|
|

Bass is back from the finisher and looking awesome. There are some areas I need to work on to get the covers and other hardware components to fit so that will be my next few tasks.
|
Left: Hard to get a good photo ofthis but I have to say the finish in beautiful and I will be posting more of this very soon. Just got it home from the finisher. Right: Back of the body is equally impressive. All the woods look amazing together! I'll probably start with general cavity cleanup and getting some conditioner on the fingeboard. |

Back of the bass looks very impressive too - we left the center core natural which really looks good and enhances the neck-thru look!
|
|
Very happy to be at the finishing stage! I still have to find wooden knobs but have a couple of good sources.
|
Left: Our bass is now heading to my finisher for its awesome green trans and clear finish! Can't wait to see it when it's done and getting everything assembled and working! Right: I received the preamp assembly from my good friends at Audere Audio. I am now ready to get this bass assembled and wired up after finishing! |

Just received the Audere preamp for the bass. Things are moving along!
|
|

Very happy to get this last machining operation done. Can't wait to see this bass in its green glory!
|
Left: We now have four recesses on the back of the bass for the ferrules that will permit stringing the instrument through the body! Back to fine sanding and blistered fingers! Right: Done with sanding AND I also dressed all the fret ends so that we are ready for our trip to my finisher. Just sanded everything with 180 grit paper! |

Doing the last pass with fine sandpaper and also got all the ends of the frets dressed and polished!
|
|

Since this bass has strings through the body at the bridge end I needed to make sure the required holes and recesses are very accurately placed. Not much room for error here!
|
Left: Now that I have the actual bridge I can make sure the through holes for the strings and the ferrule recesses that need to be cut on the back are in exactly the right places! Right: I am now setting up to machine the four counterbores for the string ferrules. Once these are cut I'm done with machining. Should end up looking nice! |

Set up and ready to run the program that will cut the recesses for the string ferrules!
|
|

Shiny gold bridge is a piece of art on its own!!!.
|
Left: I need to machine holes and back ferrule recesses for the strings that will run through the body. Just received bridge and I will get exact measurements from that and then it's off to finishing. Right: More sanding as I get the body radiused and smoothed off everywhere. Neck area is now done which is always the hardest part! |

Working on all the radii and recesses to get those parts all smooth for finishing. Big surfaces are easy but the inside radii and other curved areas are a lot of work!.
|
|

Inlay on the back cover plate is done so I can now get the rest of the sanding finished up.
|
Left: Got all the fill done in the cover plate and leveled everything. One more task done! I'm back to doing the final sanding all over the instrument. Right: I'm doing final sanding on the neck and body to prepare this instrument for the finishing process. Every surface has to be smooth and even so it's a lot of hand-work to prepare. |

Sanding all over the instrument until it feels smooth and clean enough to head to the finisher.
|
|

Starting with the blue filler for the bow and also using it for the logo on the truss rod cover.
|
Left: Getting started on the filling of the control cavity cover inlay. Should look very nice when it's all done. Also working on general sanding of the whole instrument. Right: I mixed some filler for the stars on the control cavity cover (the blue is already set). Once the filler in the stars is set I will fill the connecting dots and level the surface. |

Filling the stars with a white metallic filler. When that is set I will finish with the dots between the stars.
|
|

I put a coat of sealer on the bare wood of the cover to prevent any of the filler solutions from bleeding into the wood grain.
|
Left: In order to get the colored filling into the engraved recesses on the lid successfully I gave the plate surface a quick coat of sealer to help prevent bleeding into the wood. Right: Getting started on the back plate color filling. It's small and pretty detailed work but as long as I am careful it should be fine. One color at a time!! |

I want to get the colored filler into the recesses in the back plate - doing that as soon as possible.
|
|

Doing my best to place everything on the front pretty close to the layout of the original bass we are using as a sister instrument. I'm ready to get these holes and counterbores established.
|
Left: next challenge is to lay out the pattern for the controls as close as I can to the original bass and get the holes and counterbores established in the top plate. Right: Based on the available space in the control cavity I used my plotted points to establish holes and counterbores in the front face for the control layout. |

I got the control layout machined as close as possible to the original sister bass and I will now be looking at the exact placement of the retainers that hold the strings at the back of the body.
|
|

Got the control cover engraved and now I will move it on to getting the features filled with their respective colors.
|
Left: Was able to spend time on the laser and get the design engraved into the control cavity cover surface. Needs a little more sanding then I will seal it prior to filling with color. Right: I had a chance this morning to set up and machine the hole and recess for the Neutrik jack socket assembly. One more task out of the way! |

Was able to get the recess for the Neutrik output assembly machined. Will move on to the control holes next..
|
|

The test on a similar piece of mahogany for the Saggitarius constellartion artwork seems to have come out pretty well. I will burn this into the actual cover and it will be filled with colored compounds and should look very cool.
|
Left: I wanted to test the engraving of the constellation on some similar material before I committed to doing the same thing on the actual cover plate. Right: I thought it might be nice to include an additional bow & arrow feature at the front of the plate. If my customer OK's it I will add it to the engraving artwork that I already have. |

This is the basic design for the cover which will be a nice mirror to the features on the fingerboard.
|
|

Lots of sanding going on with the thickness and cross-sectional shape of the neck. It's almost where I want it!.
|
Left: After some intense sanding and many checks on sizes along the length of the neck I got the neck thickness down to a comfortable size. Now working on the profile. Right: Working on final fitting of the two back covers. Control cavity cover is going to have the Saggitarius artwork engraved into it. |

I am fitting and sanding the two back cavity covers. Whan that's done I will be engraving the Saggitarius constellation artwork into the control cavity cover!.
|
|

Getting the entire neck down to the finished thickness aand cross-section on a single cut is quite alot of work. Only way to get it right is to slowly work your way into finished size and shape and keep measuring and adjusting until it's just right.
|
Left: Today I was sanding the back surface of the neck to bring it to an even and slightly tapered thickness. I will gradually work this neck profile down to a finished size. Right: Time to get the serial number installed in the instrument so I cut the insert on the laser and will be gluing that in place. Also working on neck thickness. |

I am installing the serial number tab into this instrument.
|
|

Just about to attack the beck of the body with a grinder to establsih the belly cut area.
|
Left: Marking out the area which will be the belly cut relief on the back of the body. This material removal will make the bass fit the player much more comfortably. Right: I have now roughed out the belly cut on the back of the bass and I will now get started on the sanding process of that and the backof the bass in general. |

Belly cut has been roughed out and I will now get that cleaned up.
|
|

Got the tuner holes drilled through the headstock. Both the headstock and the fingerboard will now be cleaned up in preparation for finishing.
|
Left: I set up and drilled the tuner holes in the headstock. Some cleanup and finishing still required on the outer perimeter but that will be done soon. Right: Getting some final shaping done to the back of the neck and the transition into the body. Will be going to finishing fairly soon so I am excited about that! |

I am working on both the back of the headstock and back of the neck as it meets the body.
|
|

I'm using the spindle sander to shape the headstock perimeter down to the final template size and shape.
|
Left: I am now busy shaping the completed headstock down to its final profile. Once that's done I will sand the whole thing to a nice smooth finish. Right: The headstock ended up a little thicker than necessary after the front veneer was attached so I am machining a little bit of material off the back to make it perfect. |

This operation will finalize the headstiock thickness and I will then be able to drill the tuner holes.
|
|

Carefully gluing the maple headplate onto the headstock. Will look beautiful when complete!.
|
Left: I am now gluing the matching spalted maple headplate onto the headstock. The bass will look really nice with this attached. We're getting closer to finishing! Right: Headplate successfully attached and looking good! Now I have to do some sanding to create and clean up the final shape. Will be drilling the tuner holes soon too! |

The headplate is firmly attached but quite abit oversize. I will now go ahead and sand down the profile of the headstock and clean everything up.
|
|

I want to get the neck finished up to its final sizes. After that I will create a belly cut in the back of the body.
|
Left: I'm now working on the thickness and profile of the back of the neck. I'll get the neck down to the required thickness first and then carefully shape the back profile to finish it off. Right: Time to work on the installation of the headplate to match top of the body. I will have to add a couple of veneers to the bottom to start. |

While I am cleaning up the neck and fingerboard after the recent assembly I will also be getting the matching headstock plate ready for assembly..
|
|

Nice to get this done because aside from some sanding work to prep the surfaces, these are complete and ready for finishing.
|
Left: I was able to create a setup where I could drill the holes for the adjustment screws and also machine concentric counterbores on each for the adjustment screw heads. Right: This is the plan for the inlay on the back control cavity cover. It's the entire Saggitarius constellation. Should look very nice!!! |

We used selected parts of the Saggitarius constellation on the fingerboard inlay - I thought it would be nice to have the whole constellation on the back.
|
|

Starting on the shaping of the back of the neck and also the interface between the neck and the body.
|
Left: Next step on this bass was to attack it with my angle grinder so that I could rough sand some of the extra material off the back of the neck. I'll be working on this area over the next couple of days. Right: Most of the remaining work is carving, shaping and sanding. I have been busy carving the neck relief on the back. |

Working on this area is a process of careful material removal, testing and inspection and then repeating everything until the instrument looks and feels just right.
|
|

So far so good- got the adhesive mixed, applied, fingerboard fitted and everything secured with rubber bands and various clamps!
|
Left: Made the commitment to gluing the fingerboard onto the body! It's a pretty tricky process which you have to get completely done before the adhesive starts curing. Right: Fingerboard is now securely glued on to the neck of the bass. I now have quite a bit of cleanup work to do in order to remove glue overspill but looks good!! |

Looks like the fingerboard attachment is a success - the instrument looks great already and I will now get started on the post gluing cleanup!
|
|

Did some sabding and scraping work to get the top surface of the neck ready for having the fingerboard glued on.
|
Left: I spent some time cleaning the top surface of the neck and making sure the truss rod was correctly fitted. I can now go ahead and glue the fingerboard onto the neck. Right: Doing some final drilling work on the two pickup covers. Have to establish the recessed pickup holes for the vertical height adjustment screws. |

Will be carefully drilling countersunk holes for the adjustment screws.
|
|

After removing the support material from the fingerboard I placed it on the bass neck to see how it looked on the instrument.
|
Left: Three tasks to get done now. One is to clean the joint face of the fingerboard to prep for attachment. Second is to file and dress the fret ends. Third is to clean and prep joint face on the bass. Right: Tooling and supplies are all ready for the attachment of the fingerboard to the neck - a big step forward for this bass! |

I will be gluing the fingerboard onto the instrument and have set all the tooling required for the job. Talkes a little time to prep but you have to have everything at your fingertips because the adhesive starts curing as soon as you start!
|
|

Got all the frets blended along the edges of the fingerboard and I am now ready to saw off the MDF support material.
|
Left: Just about done leveling the 48 fret ends. The gold fret wire is pretty hard but I have done this before! I will be removing the board from the substrate material. Right: Text and pictures coming. Right: Fingerboard has been removed from support material and I am now cleaning up the back joint face to prepare for assembly. |

After removing the support material from the fingerboard I placed it on the bass neck to see how it looked on the instrument.
|
|

Planning to quickly take off some of the extra material along the neck of the bass to speed up the final shaping process.
|
Left: While I have the bass on the CNC I want to do a quick machining operation to rough down the neck thickness. Quicker than using a sanding/grinding tool. Right: Got all the 24 gold frets cut and installed in the fingerboard. Looks really nice! Next step is to trim all the ends flush with the fingerboard edges. |

Another big task done - all the frest are bent, cut and installed. Now have to spend some time carefully cleaning up all the ends flush with the fingerboard edges.
|
|

Very happy to get these two cavities set up and machined - gets us a lot closer to the finishing process. Whole the bass is up on the cnc I am planning to machine a little of the extra meat off the back of the neck.
|
Left: Machining of back cavities is complete. Cut the battery cavity and control cavity and both lid recesses. Also cut a slot in battery recess for the serial number insert. Right: Starting on the bending of the gold fretwire material which I will then cut into individual frets. They will then be installed along the fingerboard. |

Getting started on the process of installing the frets. When that's done the whole fingerboard can be attached to the neck.
|
|

I filed and scraped the stars to level everything with the compound radius of the fingerboard. Looks very nice and I will now move on to getting the gold alloy fretwire installed in the fret slots.
|
Left: The filler has hardened and I have filed and scraped everything back to a flat continuous surface. Looks good now and will be even more dramatic when the wood itself is finished! Right: The instrument itself is now on the CNC where I am getting ready to machine out the control cavity and battery cavity recesses. |

CNC has been busy but got a chance to get this bass up on there so that I can machine out the two back cavities.
|
|

I All these colors turned out very nicely - I can use one or more of the combinations in the fingerboard stars!
|
Left: These are the test results from mixingfrom pure pearl powder through to about a 40/60 pearl/gold powder blend. I'm going to have my customer choose one and thet this fingerboard done! Right: I'm now filling the stars with the pearl white inlay and as soon as that has cured I will level off the board and start of fret installation. |

We chose #1 for the fill color so I went ahead and mixed that up and filled all the starrecesses. Takes about a day to fully cure so as soon as it is ready I will file everything flush to the top surface of the fingerboard.
|
|

I'm going to test a couple of inlay mixes on the same material as fingerboard and see what looks best. Will be posting results asap.
|
Left: Received my inlay materials. One is pearl white and one is gold. Because we have gold harware and frets I thought it would be nice to have a hint of gold in the inlay but will let customer decide! Right: Testing out these new filler powders so that we can decide on the best formula and get these stars filled and completed! |

I mixed the white and gold in four different combinations to at least give ourselves the choices. I could do the pure white pearl OR any of the pearl/gold mixes. Since we have gold hardware anbd frets I thought it would be nice to have a little gold in there but I will leavethe final call to my customer!
|
|

Getting the dual bobbins pre-fitted into the continuous grain pickup covers. Once that's done I will drill the holes for the adjustment screws.
|
Left: Working on fitting these dual coil pickups into their respective covers. Mostly have to wrestle with the wires so that there's room for the bobbins in there. Right: I am busy carving the relief for the end of the neck and also taking measurements for machining the control and battery cavities on the back of the instrument body. |

Working on rough neck carving and also preparing to machine out the two back cavities.
|
|

Working through the cleanout process of the recesses. It's a slow and very detailed process.
|
Left: More work going on in the final setup. I'm pushing through to get everything machined to full depth and I can finally get this board off the CNC machine!! Right: I have ordered some high-end pearlescent white mineral powder for the filling of the stars on the fingerboard and I will use that to finish off the inlay work! |
Working through the cleanout process of the recesses. It's a slow and very detailed process.
|
|

This is the first of three operations to re-establish the star pattern. So far so good.
|
Left: Almost done with the first cutter. I will now use a smaller cutter to establish more detail and will finish off with a really small one to clean everything up! Right: Taking along time - I'm going to have to stop and pick things up in the morning! I will leave the machine on and that should prevent me from losing coordinates! |

Last operation but have to go very carefully. Already broke one cutter!
|
|

I'm going to re-do the setup on the CNC and re-cut the star inlay recesses. They just didn't look as punchy as I wanted them to be.
|
Left: Setting fingerboard up on the CNC for another machining op to remove the existing gold filler. Hard part is that I need to align the fingerboard exactly match the artwork pattern! Right: Getting the CNC machining pattern dead on the old is very hard to do - I have it very close and will probably make some final adjustments. |

It was a lot of work to re-align the machining pattern of the stars to the existing pattern on the fingerboard., Almost there I think.
|
|

Machining on inside of the pickup covers now done. I'll make sure the pickup bobbin assemblies fit into each one and get the holes drilled for the adjustment screws.
|
Left: Got the two pickup covers machined. I will get these sanded and then drill and counter-bore holes in 3 places on each one for the height adjustment screws. Right: Filler on the inlay recesses technically worked fine but I feel that the starts didn't come out as bright as I had hoped. Customer agrees so I will re-do the stars. |

I'm going to re-do the setup on the CNC and re-cut the star inlay recesses. They just didn't look as punchy as I wanted them to be.
|
|

It is slow and very detailed work so I will be glad when this part is all done! If I can get the inlay completed I can then get the frets into the fingerboard.
|
Left: OK, I decided to apply two colors at the same time since they will hopefully both harden overnight.All being well, I can get this inlay stuff finished tomorrow! Right: I'm now machining overall height and cutting out the insides of the two pickup covers so that the dual coil pickups will fit inside. They should look great on the bass. |

I'm busy right now cutting the inside geometry of the two pickup covers.
|
|

My pickup winding wizzard finished up the humbucking pickups. One more big step forward.
|
Left: Just got the two custom humbucking pickups back from my electronics contractor so I can get the wood covers machined so that they can be fitted! Right: Machining of the two pickup recesses in the body is now complete. I will probably move on to machining the insides of the two pickup covers and complete those. |

My CNC was free and I put the bass up there to get the two pickup cavities finalized.
|
|

Keeping things moving on the inlay process. It's a little work intensive but I think it will all be worth the effort.
|
Left: I'm filling the connecting dots between the stars with a light metallic green. Since they are very small I am hoping I am getting them all completed in one application. Right: Time now to mix and apply the compound with gold dust to create the filler for the stars on the fingerboard. When that's done I'll finish the bowman too. |

I'm just starting on the gold filler for all the stars and once they are done I will finish the bowman.
|
|

I cut the truss rod coverout of the headstock veneer blank. I'll go ahead and rough cut the headstock shape and as soon as I can I will attach it to the instrument.
|
Left: This is the headplate blank for the headstock after the truss rod cover has been cut and the logo has been engraved. Goes on after fingerboard. Right: Got started on the inlay process on the fingerboard. Doing the bowman first. Had to do an initial layer of filler and will haveto let that set. Will follow upwith 2nd application. |

First round of filling the inlay recesses. Will do the Bowman first and then move to the other details.
|
|

I am going to do 3 tests to make sure the colors I will be using work with the fingerboard.
|
Left: Fingerboard support plate has been partially trimmed and I am applying a sealer to the wood to make sure our colored compound does not bleed out of the machined areas. Right: I am setting the headstock veneer plate up on the CNC to allow me to cut the truss rod cover plate and get it all ready for assembly onto the headstock. |

I will be doing some machining to this plate so that it is ready to be attached to the headstock after the fingerboard goes on.
|
|

This ohito shows the recesses after the 2nd cut was completed. I'm now moving on to the smallest cutter whose job is to go round all the artwork and clean up all edges and corners.
|
Left: Just completed the second stage of the cutting of the recesses with .028"cutter. Working pretty well so I am now setting up for the third and final pass with a .020" diameter cutter! Right: Inlay recess cutting is done and I even cut a slot for the nut while the board was on my machine. I can now remove some of the extra MDF material. |

Inlay machining complete. Next step is to trim the support board closer to the fingerboard. After that I will seal the wood so that it's ready to accept the colored filler.
|
|

I am pretty sure this compound will do a fabulous job but I need to do another color and hardness test before committing to the actual fingerboard.
I did a lot of research to find the FINISHING epoxy that dried the hardest and most clear. This will help me get the best out of the inlay process.
|
Left: Received my special filler compound which will be critical for getting good color and hard-as-glass inlay in the fingerboard. Will do another test before filling the machined recesses. Right: First cut for inlay in progress. I will have to use three different programs using 3 different diameter cutters to get the results required. |

Working on the first pass on the inlay recesses. So far so good. Next program is the biggest one time-wise and the third will do the finishing edge details..
|
|

The programs are written and I'm setting up for the first cut of three to establish all the inlay recesses.
|
Left: I am getting ready to machine all the inlay recesses. Because its such a big job I'm waiting for a day where I have no other commitments and I can work all day on it. Right: Gold fretwire arrived! I will soon be ready to install this into the fingerboard after all the inlay has been machined and filled. Can't wait for that! |

Gold fretwire is now in my shop waiting for me to pre-bend it and install it into the fingerboard!.
|
|

Just want to make sure the results look good before machining all the inlay!.
|
Left: Decided to seal the wood and do a test of two of the colors I will be using. I'll let the compound set and level it off and see what the results are. Right: The tests came out good but I realized that I need a clear finishing epoxy to serve as the medium for the filler. After much research this product (which I ordered) had best reviews! |

I did a lot of research to find the FINISHING epoxy that dried the hardest and most clear. This will help me get the best out of the inlay process.
|
|

Ready to test the inlay recesses with a.027" diameter cutter.
|
Left: I'm going to test the inlay recess cutting on the CNC as it's probably a better setup for alignment than using the laser. Going to test cut one inlay and if that's OK will cut them all. Right: Have a test all set up and if this works I am going to go ahead and cut all the required Bowman and Star inlay recesses in the fingerboard. |

Definition worked out to be pretty acceptable but I will probably use a -020 cutter rather than a .028 to make sure I get the very small detail defined.
|
|

Setting up to cut 24 fret slots - more info coming!.
|
Left: Next thing I need to do is get the fingerboard setup finished on the CNC and cut all the fret slots. I had a few other emergencies to run but can get it done now! Right: Working my way through a couple of cuts on the fingerboard using a really small carbide end mill to create all the 24 fret slots. So far so good. |

In the process of cutting the frets into the fingerboard. Usually do them in 2 or 3 passes since the cutter is so small and I don't want it to break.
|
|

These inlays are fairly detailed so I may use the laser to do the engraving rather than a small cutting tool on the CNC - going to experiment with both and see which works best.
|
Left: I'm still working on the details of the inlay artwork but have most of it converted to vector paths and now working on specific placement of everything. Right: I received the blue turqoise powder in the mail and will combine that with my gold and green colors for the inlay on the fingerboard and the back control cavity plate. |

These are very good quality products and should result in very nice looking inlay. I will, of course, test them on similar material first!.
|
|

Pickup covers are well on the way to being completed.
|
Left: I glued the harvested pickup tops onto some material that will be the bodies of the two pickups and then cleaned up all the edges. Right: I am now setting the fingerboard up on the CNC for cutting the slots for the frets. I'm also planning on doing the inlay engraving during the same setup so that should be very interesting! |

Fingerboard back up on cnc for fret slots and probably engraving of inlay artwork too.
|
|

Nice piece of spalted maple for the headstock which will match the body nicely.
|
Left: This is the material I cut from the original top plate material which will be applied to the front of the headstock. I need to bookmatch joint it together, add some decorative veneer and glue it in place. Right: Top plate has now been successfully glued in place. Need to spend some time on the spindle sander to trim it to final body size. |

Instrument looks much more complete with the top plate attached.
|
|

The two continuous grain pickup tops have been harvested out of the top plate.
|
Left: I got the machining done that separates the pickup covers from the top plate material. This now allows me to get the top plate glued onto the body of the instrument. Right: Now gluing the top plate onto the body of the instrument. It'scurrently slightly oversize so when the glue has set I will sand off flush to the body. |

Now getting the top plate glued onto the rest of the bass body.
|
|

Got the pickup bobbins cut. Now need to assemble with their magnets.
|
Left: Pickup bobbins have been cut on the laser and are ready for me to assemble with their magnets. I hope to be able to take the completed bobbins to get wound potted and wired very soon. Right: I can now get the top plate set up on the CNC and machine out the two pickup cover pieces that I will re-use later. |

Next job is to harvest out the two pieces I need for the pickup covers from the top plate before it goes on the instrument.
|
|

Top and body are now successfully fitted together.
|
Left: The neck recess in the top plate was successful and top now fits nicely in place. It needs trimming down to the same profile as the body. Also will be cutting out the pickup tops. Right: Need to cut the pickup bobbinsso that I can verify pickup dimensions. One they are cut I will probably have my electronics guru wind them for me. |

I want to cut the pickup bobbins so that I can guarantee a good fir with the pickup covers.
|
|

We will be doing a little custom inlay on this fingerboard which will make it very unique.
|
Left: My customer wanted some personalized inlay on the fingerboard of the bass and we extended that over to the back cavity cover too. Constellation of Saggitarius. Right: I am now cutting the neck profile into the top plate so that it can fit onto the body. I previously cut a test piece to verify the dimensions. Should look good. |

Machining out the area of the top plate where the end of the neck profile will fit.
|
|

The bobbin and cover dimensions have been established and I can start work on all of this.
|
Left: I have calculated the physical sizes for the pickup covers and the pickup bobbins so I can now move forward with that part of the building process. Right: I put the body back up on the CNC so that I could cut channels for the grounding, battery power, and pickup wiring. Helps to do this before the top plate goes on! |

I got all the various wiring channels established in the top of the body. Will clean that all up and next step will be to harvest the tops of the two pickup covers out of the top plate.
|
|

Fingerboard now has a compound radius machined and is almost at final thickness.
|
Left: Compund radius on the top of the fingerboard has now been machined. It's about .015" oversize on thickness because I need to sand off the machining marks.. Right: I took the board off the CNC so that I could get the curved surface sanded nice and smooth. I will be working on some detailed inlay and need aclean surface for that. |

Fingerboard looks really nice now that it has a finished surface.
|
|

First fingerboard job on the CNC is just removing some unwanted material from the overall thickness. Next I will machine the outer profile.
|
Left: Now digging into the fingerboard work. First step here is to machine the blank down to a slightly oversize thickness to get rid of extra material. Right: Just finished the machining of the perimeter of the fingerboard. It is now at its finished length & width. Next operation will be cutting the compound radius to achieve finish thickness. |

Fingerboard is now accurately machined to its nut and body end width and also to its finished length.
|
|

Top plate being glued together after I recently machined the joint faces to create a nice clean bookmatched assembly. Next I will neeed to harvest out the pickup cover pieces..
|
Left: While I am working on the assembled body I am going ahead and gluing the top plate halves together so that I have a complete top for the instrument. Right: Getting ready now to set up the fingerboard on teh CNC. Several operations but the first will be cutting thickness and machining the outer profile. |

Next job coming up will be the machining of the fingerboard which will go on the bass right after the top plate goes on.
|
|

First chance I get I will probably install the two CF rods into the neck slots. One more task out of the way.
|
Left: I am probably going to add the two carbon fiber reinforcing rods into the slots I cut in the neck pretty soon. I have to get some special adhesive ready for that job. Right: Now gluing the two carbon fiber rods into the neck structure. It's a special adhesive that will need to cure overnight. It will then be ready for fingerboard. |

The two CF rods are being glued into their slots in the neck.
|
|

Front and back surfaces have been machined and cleaned up. Moving along!.
|
Left: I machined both the front face to establish that surface and the end of neck profile, and then went ahead and lightly machined the back to make sure that surface was also clean. Right: I'm using the spindle sander to go around the body to bring it pretty close to the template body profile. Also planning out wiring channels. |

Refining the outer shape of the body and I will then be machining some channels in the top surface for pickup wiring, battery power supply and grounding wires.
|
|

Bass looks pretty nice with the body parts attached. Will probably have the top on soon.
|
Left: Both body halves are now part of the instrument and it's starting to look like a real bass! I will do some sanding to clean surfaces and then I will refine the outer body shape a little closer to final profile. Right: Getting things ready for another CNC operation which will clean uop the top of the body and define the heel of the neck. |

This next operation will create a final joint face on the top sufrface of the body material and around the heel of the neck.
|
|

Machining the back of the core parallel to the neck-to-body angle I machined on the front.
|
Left: I decided to machine the back of the core parallel to our recently machined reference surface on the front before I went ahead and attached the two body halves. Right: Got the first of the two body halves attached to the core setion. Moving on now to gluing the second one so that we have a more complete looking instrument. |

Now gretting the body halves attached to the core section.
|
|

Gluing light veneer onto body half joint faces. Once that's done and cleaned up I will repeat with the darker veneer.
|
Left: Each of the two body halves needs two contrasting veneers attached to the joint face before I can assemble the body parts onto the core. Right now I am gluing the lighter of the two veneers onto each. Right: Here I am now gluing the second decorative veneer onto the two body halves. After some cleanup they can be attached. |

Second veneer (the darker one) being glued to both of the body halves. After some cleanup they will be ready to be glued onto the core secion.
|
|

Using the CNC table to clean up joint surfaces on the two body halves.
|
Left: I am now cutting the joint edges of the two body halves so that they are flat and square and ready for veneers and then assembly onto the instrument core section. Right: The body halves now fit the core snugly but I have to get two contrasting veneers on each body piece before I can assemble them together. |

Getting a lot closer to a complete instrument that looks a little more like a bass guitar!.
|
|

This setup was to machine a clean joint face on each side of the core assembly.
|
Left: Now it's time do some machining on the sides of the core in the two areas where the body halves will be attached. Just cleaning up the surfaces flush with the angles I previously machined. Right: Before body halves go on theor joint faces will be machined and I think I will also need decorative veneer between each joint. |

I will be adding veneers and also machining joint faces onto the two body halves.
|
|

The three sections for the truss rod have now been machined into the joint face of the neck section. Truss rod fits in there nicely. Now I have to cut slots for carbon fiber reinforcing rods.
|
Left: I machined a slot in the top of the neck to house the truss rod. Truss rod shape requires three different machined sections for it to fit properly and tightly. Got all that done successfully. Right: Lastly I have now cut two slots in the top surface of the neck into which I will be gluing the carbonfiber rods. All these operations are done now! |

Last task in this series of machining ops was to cut two slots along the length of the neck for the two carbon fiber reinforcing rods.
|
|

I machined a very important angled surface on the top surface of the core at the body end. I will fixture off this surface in upcoming machining operations.
|
Left: Just finished the third operation where I machined a very accurate neck-to-body angle on the material on top of the body end of the core. I will use this as a reference in future operations. Right: The fourth operation took a lot of time and work because of the need for accuracy. I cut the full length final width of the neck/core section. |

This particular operation needed to be worked carefully into the final combination of sizes. End result is a nice clean core profile which will soon be ready to be a real bass.
|
|

Setting the core up for several machining operations. Once this is done I will be able to attach body and top plate onto the machined core section.
|
Left: Setting the whole core section up now on the CNC. I will have several machining operations to do on front and back of this assembly but it will bring the whole instrument much further along! Right: Second operation was to machine the headstock upper surface to clean that up. It's quite a bit oversize right now but will cut later. |

Got the 2nd operation done which was cleaning up the front headstock surface. This gives me a pretty good idea of nut placement and I can calculate back based on scale length to double check end of neck and bridge locations.
|
|

Moving along. As soon as I add pieces to cover headstock width I can then get this core up on the CNC and start machining the instruments features.
|
Left: OK- instrument core assembly is complete. This is a big step in the bass's progress. I will now add a couple of pieces to allow for the width of the headstock. Right: Core is pretty much ready for machining on CNC but I decided to add the extra width to the headstock so that I could include machining of that area too. |

Just before I start machining all the core surfaces I am adding a couple of pieces of Lacewood so that this area of the core is wide enough for the finished headstock.
|
|

Gluing the first of the two lacewood outer laminates onto the center of the core. This has been a lot of work but once this is all done things will progress to a complete instrument relatively quickly.
|
Left: I'm gluing the first of the two outer laminates onto the core assembly. As soon as it sets I will clean it up and get the opposite side glued on and that will give me the basic rough but complete core to work with. Right: Last coresection laminate gluing under way. Now have 5 laminates with two veneers between each! |

Last of the gluing setups for the core section assembly. I will have to add a little Lacewood each side of the headstock to create width for the headstock but getting this done was a big step!.
|
|

First of two veneer applications on the remaining core sections. I will then be able to complete the core section
|
Left: New veneer has been cut and I am gluing the first of the two applications onto one of the outer laminates of the core section. As soon as this is done I will glue the other one - using most of my clamps! Right: Now gluing dark veneer onto the second outer laminate of the core section. We are getting close to assembling the core itself! |

A lot of work gluing on all of these veneers but once this setup is dry I can assemble the rest of the core section and things will move ahead quite quickly!
|
|

OI want to get the body pieces machined and assembled so that I can get this top glued onto the instrument. There's always a danger of woodfrom Canada distorting a little in this dry California atmosphere!!.
|
Left: Time to get the two halves of the top plate machined so that I can glue them together and create a bookmatched top plate! Should look really nice when complete. Right: Received my new darker veneer so I will get everything ready for the two surfaces that this material bneeds to go on. Too damn cold to glue it tonight! |

Received my darker veneer delivery from Colorado this afternoon so I will try to get this cut and applied sometime in the next 24hrs!
|
|

Gluing the first two core laminates together. I always work from the center out. This will create a very strong core section for the instrument.
|
Left: Assembly of the instrument has begun. I am now gluing the first of the two dark laminates to the center laminate. When this sets I will unclamp and clean the whole thing up ready for core laminate 3! Right: Now gluing the third of five laminates together. It usually takes most of a day to ensure that the glue joint is fully set. |

Once this joint is glued I only have the two outer Lacewood pieces to assemble. Can't do that till I get my slightly darker veneer but plenty other stuff to keep me busy.
|
|

Gluing the last two white veneers onto laminates 2 and 3. Will have a core section together pretty soon.
|
Left: The two dark laminates for the core section are now in the vacuum press getting their second light veneer glued on. Once this operation is done they will be ready for final assembly. Right: 2nd veneer glued on and I now need to get these trimmed and cleaned up. I can now go ahead and get these assembled onto the center core laminate. |

Each of the center laminates now have decorative veneer on both sides. I will be moving on to the outer laminates as soon as my new veneer material arrives but in the meantime I can assemble the forst three core laminates.
|
|

Not the greatest photo I have ever taken but it shows the center core in the vacuum press where I am attaching the 2nd dark veneer!
|
Left: Now gluing the second dark veneer onto the center core laminate. Once I get all these veneers on I can assemble the core of the instrument. Right: Now gluing maple veneers on to the two dark laminates. I'll need to repeat this operation so that they are veneered on both sides with the Maple veneer! |

Now gluing light veneers onto the two dark laminates. Both of these laminates get veneered both sides so this is the first of two operations to do this.
|
|

I am using the CNC to cut the center laminate to the taper that I calculated on the computer.
|
Left: I have the center laminate for the core of the bass up on the CNC where I am machining it to its final thickness and taper. Now that I have done this I can start adding veneers. Right: Gluing a dark veneer on the side of the maple central laminate of the core section of the bass. Will be doing this eight times for all the required veneers. |

Center piece of the neck/core is in the vacuum press where I am adding the first of 8 veneers. It will be worth it when it is all done!
|
|

I now have delivery of the maple veneer that will allow me to proceed with work on the top plate and the core laminates!.
|
Left: Good news - the light veneer package was delivered so I can get that unpacked and glued onto the two top halves. Right: I unpackaged the maple veneer and cut two pieces that will complete the pinstriping for top plate halves. I now have to get these glued together. Once that's done I join the two plates into one complete top. |

Maple veneer ready to be glued onto the two top place pieces.
|
|

Gluing dark veneer onto the back sides of the top plate halves.
|
Left: The two top halves are now in the vaccuum press where I am gluing on the dark veneer onto the back of each. I will have top repeat this processwith the light veneer too. Right: This is the dark veneer attached to the back of the two top plates. I want to get the second light veneer attached next so I can keep moving! |

Successfil gluing of the dark veneer pinstriping. Before I do any more machining I need to get the light veneer applied too!.
|
|

Top and bottom body halves have been rough sawn from the mahogany board. Another step forward!.
|
Left: I got the mahogany body halves rough sawn from the wood I recentrly purchased. These will need drum sanding and more sawing and machining but it's a good start on this area of the instrument. Right: Body halves have been drum sanded both sides close to size and I also sawed off and sanded matching material for the cover plates. |

Body halves moving forward - they have been sawed and sanded and I also have perfectly matching material fr the cavity covers!.
|
|

Two top halves are now sanded to thickness and my next move is to glue a dark veneer onto the back of each piece..
|
Left: I sanded the top plate halves down a little bit to final thickness. As soon as I get at least one veneer on the back of each I will machine a joint face and glue the two into one. Right: This particular bass has a lot of detail work - I have to do double veneer pinstriping between each joint - something I stopped doing some time ago! |

TI have plenty of dark veneer for pinstriping but nomaple for the light pinstriping. I'm ordering a quantity of raw maple veneer from a supplier for this job.
|
|

These two Lacewood pieces are just a tiny bit darker than the corresponding pieces on the original bass but were the only pieces of that species I could find anywhere. They may well come out lighter after machining and shaping. They will look awesome with the other laminates.
|
Left: Sawed out the maple center laminate and then sanded both sides of all three pieces. I still have the two pinstripe pieces to rough saw but moving ahead. Right: I cut out the two pinstripe pieces for the core section and sanded them down to what appears to be the optimum thickness. Will have a core section done soon. |

I now have all 5 components for the core construction. I have dark veneer but need to get hold of some light veneer to get this job completed.
|
|

The bookmatched wood came out looking very good and I will now look at the earlier bass we are copying and try to match the top plate thickness as closely as I can.
|
Left: Finally got the wood split in two and sanded flat. Looks pretty nice and more grain detail than I had expected which is good! I now have to check top thickness on that earlier bass! Right: Top plate halves have been rough cut to facilitate final sanding. I will be checking on final thickness and machining a joint face soon. |

We now have a rough top plate in two pieces. I need to do some sanding and machining before joining them together to make one bookmatched top.
|
|

I sawed out the two Lacewood core laminates from the material I bought. I'll do the same to the maple material and then check my inventory of veneers for pinstriping.
|
Left: I used my templates to rough cut two of the neck/core components of the instrument out of the lacewood material. I now need to do the same thing with the maple. Right: I'm in the gradual process of sawing through this big hunk of maple to create two nicely bookmatched pieces. This is quite a hard piece of maple! |

My bandsaw is working its way through this maple board fairly slowly but when it is done I will rough cut the two pieces and get then drum sanded nice and flat.
|
|

Another trip to a wood supplier so that I could hand pick the neck woods. Maple has a nice curl in it and the Lacewood should end up being a fairly good match to the original. The lacewood was hard to locate and I think it is going to end up a little lighter when cut.
|
Left: I drove to another wood supplier here in So. Cal and got hold of the Lacewood and Maple that I was having trouble locating. Now I can get started on the core section. Right: Just took delivery of the Spalted Maple board that I will be using for top plate and headstock. Nice looking material which now has to be sawn in two! |

This is the black line Spalted Maple I ordered from Canada. Have a very nice grain. I need to split it down the center to create the bopokmatched top plates so the resulting grain will be a little different but should look awesome.
|
|

I'm using the original template to mark out body halves on the mahogany wood I bought. Will get this sawn out and keep things moving forward.
|
Left: I am looking for the Lacewood and Maple neck components. While that's going on, I will work on getting the body half pieces cut from the mahogany material blanks! Right: Fingerboard has been rough sawn slightly oversize. It has been glued to a support material which will help hold it and keep it rigid during machining. |

WKingwood has been rough cut slightly oversize and attached to a solid piece of MDF which will support it while it is being machined and prepared for installation.
|
|

While I have the Kingwood in my shop I decided to start work on the fingerboard operations, the first of which is to drum sand it flat on both sides.
|
Left: I decided to get the kingwood for the fingerboard drum sanded. I will rough cut it to size and attach it to a piece of support material. Right: I was able to extract some critical dimensions from my old files on the earlier instrument and I am using those to reconstruct a 100% scale drawing which I will use for machining. |

I need the 100% scale vector drawing to make sure machining dimensions are correct as I move through the building process. This will help me get started on the fingerboard while I am getting hold of the other woods.
|
|

After some detective work I ended up with this maple board for the top plate and headstock veneer of the bass. I would say this one will end up matching the other bass as closely as nature will allow!
|
Left: I located a Spalted Black Line Maple board which is the closest one I can find to a matching grain - I think it will be a pretty good match when done and tinted/finished! Right: Made a trip to one of my main suppliers. Was able to get Kingwood for fingerboard, African Mahogany for body halves and a nice Peruvian wood for pinstriping. |

The wood importer is only about an hour away so it was worth it to start there for some of the harder woods to find. I found Kingwood for the fingerboard (surprisingly) and also Mahogany for the back of the body. Also found some hardwood from Peru (not sure of the name) which is the perfect color for the neck pin-stripes. Still need to locate the light neck woods but they should not be a problem as I have other wood suppliers in this general area.
|
|

This is a photo of the back of the bass I will be using as reference. Right now I am looking for Spalted Maple and Lacewood which are thetwo hardest to find and match.
|
Left: I will be building a fretted replica of a fretless bass I built some time ago. I'm going to do my best to replicate the same woods and even same wood grains as much as possible. Right: Biggest challenge is finding some spalted black line maple that at least slightly matches the grain in the one I am duplicating. Searching right now.... |

There's spalted maple and there's Black Line Spalted Maple - the latter appears to be a bit harder to find. I have a supplier up in Canada whi may have some.
|
|