
Worked on the final setup details and will be stringing the guitar up again for a final test of everything. I'll add strap buttons and all being well after that it should be a complete instrument.
|
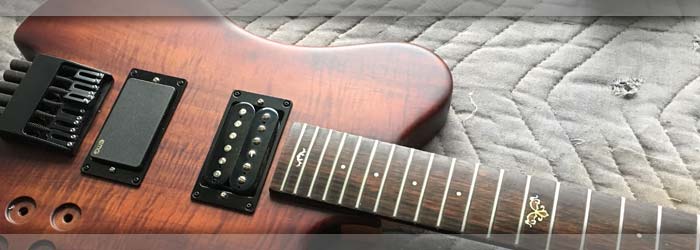
Left: Frets have been dressed and leveled and last tweaks on nut slots have been done. I added copper shielding to the back of the cavity cover and added the control knobs. Right: I added the strap buttons and it's mechanically complete - I have one nut slot to slightly refine and we're good. I am working on getting the packing together. |

Very nice looking guitar and quite unusual in its compact size.
|
|

Being careful to align the magnets in the back of the cavity cover.
|
Left: I used the positions of the cavity magnets top plot and drill the holes for the matching magnets on the back of the cavity cover. Will add magnets and shield with copper. Right: Cavity cover is now set in the recess on the back with its neo magnets holding it on. The back of the guitar looks really nice with everything in place. |

Cavity cover now attached. I may craft a little fingernail lift access at the front for eay removal.
|
|

Right now I am filing the nut slots which is hard to do with the string retainer attached!
|
Left: Last couple of setup jobs, right now I am filing the nut slots down to their optimum level. I'll also check fret leveling and add magnets and copper to the inside of the cavity cover. Right: Im working on getting the neodymium magnets installed into the back of the cover so we have the cover attached seamlessly. Will look good. |

One of my last few jobs is getting the cavity cover attached.
|
|
This is the control cavity after we resolved the wiring situation. Everything works the way it should and now I only have a couple of jobs to do to be ready to ship. Have to add magnets to the cavity cover and finish the nut slots.
|
Left: I got sound out of the guitar - tone works too. I have to resolve a volume conflict but that seems to be pretty simple. Hopefully running 100% after some detective work! Right: I brought the guitar to my electronics guru to make sure the pickups, caps, switch and grounding wiring were all wired in the best possible way. |

This is the control cavity after we resolved the wiring situation. Everything works the way it should and now I only have a couple of jobs to do to be ready to ship. Have to add magnets to the cavity cover and finish the nut slots.
|
|

Just have the capacitors to add to complete the wiring in the control cavity.
|
Left: The two tone controls are getting special capacitors which should get the best and cleanest sounds out of the pickups. These are pretty high quality ones. Right: Working on the final stage of the control cavity getting the caps installed and hooking up the 3-way selector switch. If all this works I will work on final setup. |

OK- according to my wiring diagram this is all correct. Will see what happens!.
|
|

Got the jack socket located and installed and now getting back to the rest of the wiring.
|
Left: I got the Neutrik locking jack socket installed and more of the wiring taken care of. I'm now adding more of the wiring and the last part will be the selector switch. Right: The guitar now has strings attached and I will be working on the nut and truss rod to get things working within specs. Looking pretty nice! |

Strings are on and I'm now working on all the details.
|
|

Stringing up for some testing - so far so good!
|
Left: I'm stringing the guitar up so that I have a way to test shound. Having the strings on will alse allow me to finish up the nut slots and get the action the way we want it. Right: Wiring in progress and making sure we have good strong connections. Once his is all done I will secure the output plug assembly and plug her in! |

Doing the wiring methodically and it should look nice and tidy when finished.
|
|

Pickups in and pots going in - I can start the wiring process.
|
Left: I have the pots, switches and plugs all ready so I'm going to be wiring this system up and get some ound out of these pickups Can't wait to hear it.. Right: Since I am adding the potentiometers internall I can also preview the black knobs we got for this guitar which look really good with all the other black hardware. |

Did a test fit of the black knobs - looking good!
|
|

I filed the nut to final shape and I am now establishing the six string slots.
|
Left: Now cutting the string slots in the nut so that I can get this instrument strung up. Once strings are on I can test the sound and wrap up the electronics. Right: I have my wiring diagram on hand for getting the internal electronics connected up. Just want to make sure it remains nice and tidy in there! |

GI will be getting the internal wiring done next - we are close to being DONE!
|
|

Holes for controls have been established so I will go ahead and get the electronics installed.
|
Left: I got the holes reamed out to fit the threaded portions of the potentiometers and I can now go ahead and get everything installed into the cavity. Right: The little string retainer at the end of the neck has been installed so I will get the nut finished and get strings on this instrument. Coming together nicely! |

GThe Hipshot string retainer has been positioned and screwed into place.
|
|

This little assembly will retain the ends of the strings on the guitar. I'm working on getting it carefully installed so that I can get the strings on!.
|
Left: This is the very compact Hipshot string retainer I am using for the end of the neck. First time I have used one of these but it seems well designed and I really like it!. Right: Next task is getting the Neutrik locking plug assembly set into body. Again, had a little work to remove overspray but the plug is now in place and one more thing done! |

Got the Neutrik plug set into the body. Will drill and attach with screws. Keeping the ball rolling here!
|
|

The guitar is looking nice with its pickups in.
|
Left: I have been working on getting the two pickups physically installed in the body - the look really nice with their metal pickup rings. I have to get the rings attached with their screws. Right: I'm positioning and marking the locations for the pickup ring screws so that they can be permanently fixed to the body. Controls next. |

Almost done with this very nice instrument - the electronics go in next.
|
|

Bridge now on a re-assembled (had to remove some saddles to get at the mounting screws).
|
Left: I got the bridge bolted onto the body and reassembled the saddles and I also fitted and mounted the black 3-way selector switch which looks really nice. Right: OK, copper now installed in cavity bottom, sides and top. I will solder the bridge ground to the shielding and then get the pickups and potentiometers installed. |

Getting the copper shielding into a little area like this is a tricky job, glad it is now done.
|
|

I'll be able to get the bridge mounnted as soon as I get the grounding established.
|
Left: I was able to plot the path of the ground wire channel on the top of the instrument so I can now drill and install the bridge ground wiring. EMG also ready to go in! Right: Grounding wire drilled and threaded through to control cavity. Also got the retaining holes for the bridge plotted out and drilled so the bridge can now go on! |

Couldn't mount bridge until I got the grounding wire set up - now I can get that installed!
|
|

I need to set the bridge based on scale length and then drill a hole to intersect with the wiring channel I machined into the body before the top went on.
|
Left: I am now fitting the bridge to the instrument and locating the access I need to run a grounding wire from bridge through to control cavity. Right: Since all of our hardware is black I went on a hunt for a black/black selector switch and finally found a suitable one on the internet which just arrived in time! |

This switch will look much better on the guitar than the original one I bought!
|
|

Copper shielding has now been applied to the pickup cavities. Now on to the control cavity..
|
Left: The two pickup recesses have now been carefully lined with copper shielding which allows me to move ahead and do the same work on the control cavity. Pickups in soon. Right: Adding copper shielding to the control cavity and drilling holed for the magnets that will hold the cover in place. Those go in before I finish copper. |

Copper shielding and neo magnets going into control cavity. After that I finish the copper application.
|
|

The Koa on teh back was a really nice extra feature. Everything looks awesome so far, I now have to get copper shielding into that cavity!.
|
Left: Got the neck fitted and bolted on to the body so now we can see the whole instrument which I think looks awesome from both front and back! Right: This photo shows the guitar with the neck attached. It feels good to hold, it's not heavy, it sits and balances nicely and I can't wait to hear it talk as soon as I get the pickups in! |

Guitar is now one piece and I'm very happy with how things came out.
|
|

Just checking fit with the two pickups as they are no always the same physical size. They both fit and all I have to do is get some copper shielding installed in the cavities first.
|
Left: Have the Fralin and EMG pickups unpacked and ready to be installed in as soon as I have the copper shielding applied in the pickup cavities. Right: As much as I hate machining an instrument after finishing has been done - the EMG was a tiny bit larger and just a little tight in the recess for comfort. I did a very minimal size increase. |

The EMG pickup was just a little larger than stock - I imagine because it was potted and may have ended up a tiny bit mlarger because of that process. Anyway - now resolved and moving onward.
|
|

Quite a lot of intricate work to make sure the overspray is removed without chippig or otherwise compromising the surrounding finish. All good and moving on.
|
Left: After some careful dremel work I was able to get the four retaining washers and the cavity cover to fit into their respective recesses. should have neck attached soon. Right: I have been adding some wood sealer to the fingerboard area to get thke neck ready for assembly. Need to add a nut and the string retainer now. |

The neck has has a couple of coats of fingerboard sealer and now I need to get the nut set in there.
|
|

Doing a bit of sanding and scraping to clean out oversp[ray insie the neck pocket.
|
Left: It's inevitable to get a bit of overspray in the various recesses of the guitar so my next task is cleaning out the neck pocket and cover recess to establish good fit on everything. Right: I was able to clean up the neck joint area so that the neck would fit back into the pocket. I will now fit the cover and the neck retaining rings. |

Neck is now fitted in place and I'll keep things moving as quickly as possible to finish this thing up!
|
|

I really like the color, finish and grain on this guitar. Looks beautiful. He didn't have to do this but my finisher wrapped the sienna sunburst round the body to the core at the back. Brings it all together beautifully - will post more pics..
|
Left: I was able to hit the road today and drive up to my finisher's location to pick up the guitar boidy, neck and cavity cover. Colors are awesome and grain effect changes depending on light! Right: This photo shows the back with the Koa and maple core and the mahogany wings which were trans tinted to blend with the top plate. |

Great grain and colors and this body will look so good with the matching laminates of the neck!.
|
|

Some of the parts I will be using to assemble. The selector switch will have a black knob on it, not a white one as shown.
|
Left: I am getting ready to go pick up this guitar from my finisher and I'm getting all my hardware and electronics prepped for installation. Looking forward to finishing it up! Right: I got this photo from my finisher and he told me the guitar would be done tomorrow so I will drive there and pick it up in the morning! Looks beautiful. |

That Curly Koa always comes out amazing.
|
|

Holes have now been drilled and counterbored for the 4 knobs and the selector switch. We are pretty much ready to go to finishing!
|
Left: I got the body up on the CNC and machined the four recessed holes for the knobs and the hole for the selector switch. I recess the holes so that the knobs sit nice and flush with the top surface of the guitar. Right: The guitar has made its way to the finisher where we will be applying a very attractive sienna sunburst/clearcoat. |

The front and back of this guitar are going to look awesome after finishing.
|
|

The guitar body and the control cavity are relatively small - if I use mini pots inside the cavity I can distribute the controls as shown.
|
Left: Last thing I have to do is establish holes and recesses for the 4 knobs and one selector switch that will be on this guitar. Best option is probably as drawn in the photo. Right: OK - small adjustment on knob and switch placement as I want to keep knobs etc out of the player's way but at the same time make the best of available space. |

NI know my customer didn't want knobs too close to where his hands would be.
|
|

Back of the guitar looks really nice - can't wait to see if after finishing.
|
Left: I have been doing a lot of sanding on the neck - that's pretty much done now and I have to do some finishing touches to the body of the guitar. Looking good. Right: Neck done and working on body refinements and sanding. I will need to quickly establish hole and selector positions but otherwise almost done here. |

Now working on getting the body ready to go to finishing.
|
|

Working on the radius around the perimeter of the body..
|
Left: Front of the guitar looking really nice - the Koa is beautiful and will be MUCH more awesome after finishing. I am working on edge breaks and general sanding. Right: I added some filler to the nameplate area. I still have to sand it so you can't yet see the colors and contrast there will be in the finished guitar! |

Nameplate and serial being worked on.
|
|

Neck feels pretty good now - I tested it while it was attached to the body and the whole thing felt really nice. Did some work on the front of the headstock to establish a fit with the Hipshot string retainer..
|
Left: I have been sanding the neck to bring it into the optimum thickness and profile curve so that I can get it ready for finishing. Just have some sanding to do. Right: Back of the instrument also ready for a lot of final sanding so that I can get it to my finisher. Still have to add the output jack socket. |

Body just about done except for a lot of sanding with various grits to get the whole thing nice and smooth.
|
|

I now have the Fralin pickup so moving on to get the body and neck ready for finishing..
|
Left: Received the Lindy Fralin pickup for the neck position on the guitar. I will check the wiring and polarity scenarios to make sure I have the right wiring for these two pickups! Right: Text and picture coming. Working on a nameplate right now on which I will laser and fill the Watson Logo. Not many places on a headless so it's going below tuners. |

It will be good to have both pickups here. EMG arrived today.
|
|

Good to get the neck bolted on - want to do some shaping while it is attached.
|
Left: Neck is bolted on using temporary bolts and rings. I will go ahead and get some of this neck carved closer to finished dimensions while the guitr is in one piece! Right: Received the EMG pickup for the bridge location on the guitar! Great to have that, and I should receive the FRalin pickup soon to complete the set. |

It will be good to have both pickups here. EMG arrived today.
|
|

Fralin Unbucker pickup ordered for the neck position!!.
|
Left: I had to work a little on this but finally got the neck pickup ordered from Fralin pickups. Mission accomplished so far and should see this unit pretty soon! Right: I have finish drilled nect retainer screw holes to size and used thos locations to spot drill the back of the neck heel so that I can get the neck attached to the body. |

Ready to get the neck attached, that will allow me to get the finished shape and thickness of the neck established.
|
|

We now have a comtrol cavity in this guitar!.
|
Left: I got the body set up on the CNC and machined the cavity for the control cavity and the recess for the cavity lid I recently cut. Belly cut is next! Right: I ordered an EMG H3A pickup for the bridge position on the guitar based on my customer's preferences. Also working on getting a Fralin pickup in the neck position! |

This pickup should do a gret job in the neck position.
|
|

Got the program written and now cutting out the cover plate.
|
Left: I cut and sanded a really nice piece of curly Koa which will be the control cavity cover and will match the Koa laminate running through the body and neck. Now getting it cut. Right: I now have the neck up on the CNC where I am drilling in the little holes for the side dots. Best dong this on CNC for good accuracy! |

Drilling all the side dot holes so that we can get this neck completed.
|
|

One more task done and closer to getting this little beauty to finishing. The woods are going to look really good together!
|
Left: Got the four retainer recesses cut on the CNC machine and I can now bolt the neck onto the body so that I can resolve several other things. Right: Marking out the control cavity area so that I can get that and the lid machined. I'm making a beautiful matching curly Koa lid for the control cavity. |

Plotting out a roughcavity shape which I will then refine in the computer and write a program.
|
|

Just roughing doen the back of the neck to reduce mass. More detaild carving will follow.
|
Left: I'm doing some rough carving on the back of the neck - I left it quite a bit oversize in thickness during gluing but now need to take that extra meat off. Will finish when it's bolted to body. Right: Fitting neck for the purpose of getting the string retainer holes and recesses established. That way I can work on a one-piece instrument! |

Getting ready to cut holes and recesses for the nect retainer hardware.
|
|

I glued the fingerboard onto the neck and when this has cured and has been cleaned up I can establish the clamping screw holes and get the back of the neck profiled.
|
Left: I am now gluing the fingerboard onto the neck and I'm using rubber bands as they are one of the best methods to apply even pressure over a curved surface. Right: Fingerboard has now been successfully glued onto the neck and things are coming together quite nicely. I need to do some carving on the back of the neck now. |

All the parts of this guitar are coming together - fingerboard is on and I can now start carving.
|
|

Cutting pickup recesses in the body.
|
Left: Body has been set up on CNC where I am cutting out the two pickup recesses for the humbuckers we will be installing in the finished product, Right: Neck has now been machined to a thickness that will allow the strings to meet bridge at the correct height. I'm anxious to get the fingerboard attached and move forward |

End f the neck has been sized to establish the correct height in the neck pocket.
|
|

I'm ready to cut the pickup recesses in the body - this pic shows the placement.
|
Left: This photo shows the layout of the fingerboard and pickups relative to the bridge set on the 24 inch scale length. I'm just about to machine pickup recesses. Right: Before I attach the fingerboard to the neck I need to machine the heel of the neck to the right height to work with the neck angle and bridge height. |

Doing a machining op to establish the final thickness of the neck heele.
|
|

Fingerboard has now been fretted.
|
Left: All the frets are now in the fingerboard and I am in the process of grinding down the ends of all the frets so that they will end up flush with fingerboard edges. Right: On the CNC starting to set up for cutting the recesses for the two humbucker pickups. I bought cool black metal pickup rings for this guitar to match hardware. |

Getting set up to cut the two pickup recesses.
|
|

I'm setting up to pre-bend the fret wire, cut it and get the individual frets installed.
|
Left: Just getting ready to do the frets in the fingerboard. The fret wire has to be pre-bent first, and then cut a little oversize for each fret location. Right: I got started on the fret insallation and so far it's all looking great. The inlay looks really nice now that the frets frame it. As soon as this is done I have to file them all flush with sides. |

Frets going in nicely, the board is looking really nice.
|
|

Started with the most trick inlay piece and I am working back from there.
|
Left: I'm working on getting these delicate little inlay pieces installed so that I have a finished fingerboard to work with. Going carefully under magnification. Right: I got all the inlay pieces installed along the whole finherboard and they look pretty good in there!! I'm going to add a protective sealer and then prep for fret installation. |

Got all the shell inlay installed and just have to seal everything up and get the surface ready for frets.
|
|

Fingerboard and body look pretty good together. Ready to start work on the inlay process.
|
Left: I trimmed the substrate material on the fingerboard so that I can more easily install the frets. Next though is getting inlay material into the recesses in the fingerboard. Right: The inlay pieces on this neck are VERY delicate and I have to be very careful in cutting and handling these pieces. Getting setto install fret 12 inlay. |

Some of the smallest and most detailed inlay I have had to do - taking great care.
|
|

Fret 12 inlay under way.
|
Left: This is the fret 12 inlay recess which looks like it will turn out fine. Want to get these all in and filled because I need to finish the neck! Right: By my customer's request we are putting small dots in the fingerboard. They are 1/8 inch diameter. Wanted to illustrate this as I will be ready to complete the fingerboard soon. |

This photo shows the inlay recesses for the fingerboard.
|
|

Measuring things out so I can place the pickup recesses.
|
Left: I have the instrument on the bench so that I can verify bridge position on the 24in scale and from there mark out the locations for the two pickups. Right: I'm busy on the CNC cutting the more complex inlay recesses. The one between frets 23 and 24 is quite small so I am using a .023 end mill to try to maximize the detail. |

Using a very small end mill to cut a recess for the inlay pieces..
|
|

I want to get the recesses cut in the fingerboard so that I can take care of the inlay.
|
Left: We have two inlay pieces at frets 12 and 24 and the remaining positions will be small dots (1/8"). I'm getting these placed on my 100% drawing so that I can program for cutting recesses. Right: I have been writing a program to take care of the inlay on the fingerboard. They have to fit between the frets as well as possible. |

The inlays on frets 12 and 24 are being sized to fit in the remaining space between the frets at these locations.
|
|

Just finishing up machining of the neck pocket!.
|
Left: The pocket for the neck has now been machined into the body. This allows me to plot out the pickup recesses and do the final location for the bridge. Right: Now that I have the neck pocket established I can use that reference point to place the pickup recesses and final bridge location. Will get that and some shaping done asap. |

The body is now ready for establish the pickup recesses and a number of other features.
|
|

Body is up on the CNC so that I can machine out the neck recess.
|
Left: I'm now setting up to cut the neck recess into the body. It has to be very slightly angled to suit the height of the saddles on the bridge. It will also help me establish pickup recess locations. Right: I have ordered jumbo guitar fretwire for this instrument and as soon as I get the inlay work done those frets will be installed. |

TaI have jumbo fretwire (similar to Gibson) on the way for installation into the fingerboard.
|
|

Created tuner clearance and now establishing bridge location so that I cen get the neck set.
|
Left: I cut out the clearance at the back end of the body for the tuner knobs, making sure that they stay inboard so that they remain protected by the body on the finished instrument. Right: Doing some carving at the back end of the body to best suit the tuning knob extensions on the Hipshot bridge. Should look nice! |

Getting things cleaned up at the back of the body where the bridge/tuners will be located.
|
|

I received the Hipshot hardware in the mail - very happy with it.
|
Left: I received the bridge/tuner and string retainer hardware from Hipshot and it looks like it will do a great job on this guitar. I'm looking forward to getting it assembled! Right: I'm using the bridge assembly to allow me to do some plotting of linear placement points for the neck and fingerboard. These parts will soon be together! |

The bridge helps me guarantee that I have the correct relationship between the saddles and the neck/fingerboard.
|
|

Did some sanding on the raduised fingerboard top to get it ready for inlay and fret installation.
|
Left: Prior to inlays and fret work I have to carefully sand the top of the fingerboard to remove machining marks and generate a nice smooth finished surface on the wood. Right: Following some dialog with my customer we have decided to use some custom inlay on frets 12 and 24 and small dots everywhere else. Working on that. |

There were a couple of inlay designs my customer likes and I am creating vector files of these so that I can program and cut them in the fingerboard.
|
|
I will finish the body contours as soon as I receive the Hipshot hardware.
|
Left: Did some more sanding work around the body to get it a little more ready for fiishing. Plotting out the control cavity and then the neck pocket. Right: We have a couple of concepts for the inlay of this instrument. One involves these unusual number icons which would definitely be a conversation starter if we use them! |

We are considering using these icons for individual fingerboard markers.
|
|

Hipshot hardware is awesome - I am expecting delivery of the units for this guitar any day!.
|
Left: I ordered a hipshot headless bridge and a lo-pro string retainer. Very good quality stuff and will work great on this guitar. This is not actual picture but it's close except retainer is smaller. Right: The body has been adjusted close to where it should need to be based on scale length and hardware. More data coming soon!. |

I will finish the body contours as soon as I receive the Hipshot hardware.
|
|

Fingerboard on CNC having been machined to its finished profile.
|
Left: I have now machined the fingerboard to its finished with and length and I'm now getting things set up so that I can start cutting the compound radius. Right: I am now cutting the compound radius on the top of the fingerboard and in the process generating its final thickness. It's best to get all these operations done in one setup! |

Cutting the 12-16 inch compound radius!.
|
|

Fingerboard attached o a stabilizing board so that I can fixture it on the CNC.
|
Left: Fingerboard material has been sanded and now attached to a substrate piece so that I can get some machining done to it. Right: Because of its slightly shorter scale and headless configuration I have to slightly modify the tele style body contour so that tuners will be properly placed and upper neck access is good. |

Doing some body contour adjustments so that everything fits in the 24 inch scale!.
|
|

Gluing and clamping two carbon fiber rods into the slots I machined into the top of the neck.
|
Left: I am now gluing the two carbon fiber reinforcing rods into the structure of the neck. This will allow me to move on to shaping the neck and getting it fitted to the body. Right: This is the neck after the carbon fiber rods had been leveled down flush with surface and the Macassar Ebony fingerboard blank next to it. |

Got the CF rods sanded down flush with the neck joint surface.
|
|

Cut two carbon fiber rods for this neck and they are now ready to be fitted and glued in place.
|
Left: These are the two carbon fiber rods I will be embedding into the neck. I may get the neck trimmed up around the edges before I do that. Right: I am going to use a really nice and even piece of Macassar Ebony for the fingerboard. This will look really good with the Koa top and will be a great color combination. |
Cut two carbon fiber rods for this neck and they are now ready to be fitted and glued in place.
|
|

Truss rod slot established and I will now cut a couple of slots for carbon fiber rods.
|
Left: The truss rod requires machining of three different widths and depths for an ideal fit but I got that done and the rod fits in there just the way it should. Right: Just finished cutting the two slots for the carbon fiber re-inforcing rods that I will be embedding into the neck. I can now get the neck trimmed up to size. |

Carbon fiber slots have been cut and I am now able to get the whole neck trimmed to size and move things forward.
|
|

Top surface has been cleaned up - now I can machine the neck perimeter..
|
Left: I started the work on the neck by machining a nice flat and square surface on the top which will be the face we will glue the fingerboard onto. Right: I have now cut the primeter of the neck so it is at it's final size and length. Next task will be to cut the geometry for the truss rod and two slots for carbon fiber rods. |

The neck has now been cut to its final dimensions and I am gointo cut the slots for truss rod and carbon fiber re-inforcement.
|
|

Nice to get the top fixed on - it's starting to look like a real guitar. .
|
Left: The body of the guitar is out of the vacuum press and the bookmatched top has been successfully attached. I will now clean up the edges and get it ready for machining. Right: I'm setting up on the CNC so that I can cut most of the features of the neck. Once that's done I can get the eck posket into the instrument body. |

Setting up to cut neck width, top surface, truss rod slot and carbon fiber rod slots. I'll also be taking into acount the string retainer assembly where the headstock would be.
|
|

Short scale truss rods came in and I can move forward with the neck of the instrument.
|
Left: I ordered two different short scale rods so I would be sure to have the right one. The longer one (15.25") will do great - I'll find a use for the shorter one. Right: Time to get the Koa top plate glued onto the body of this guitar. I'm using the vacuum press to do this as it's the easiestr wat to apply even pressure over a large surface. |

Gluing the bookmatched top plate ontop the body of the guitar.
|
|

Top plate now bookmatched together and I will get this glued onto the body as soon as I can
|
Left: Top plate now glued together so it is pretty much ready to be attached to the body to make on complete piece. Koa is looking good and it hasn't even been sanded yet!. Right: At 24" scale the neck for this guitar is too short for my regular guitar truss rods. I have ordered a 15.25" rod which will do the job! |

Needed to order a special truss rod for this slightly shorter scale guitar neck.
|
|

I wanted to mark out wiring channels so that I could keep working on the body and get the top plate attached.
|
Left: Now that I have the appropriate measurements I can plot out pickup and bridge locations and mark where my wiring channels for pickups and grounding wires will be before the top goes on. Right: I got the two Koa top plates set up on CNC machine so that I could cut a super clean joint on the edges for bookmatching them. |

Cutting a very accurate joint face on both top plate halves so that I can get them gued together into one bookmatched top.
|
|

Neck and body have continuous tapers so that it all will blend beautifully when put together!.
|
Left: The body has been sanded both sides so it is close to being ready to have the top put on. I will probably do some cleanup of the body shape first. Right: I'm now measuring and marking body and neck based on my customer's chosen scale length of 24". Need to do this to plan for neck joint and also for pickup placement. |

Setting the scale length to 24" so indicate where I will be cutting and trimming the body and neck components.
|
|

Nice combination for the back of the instrument - should look really nice when it is assembled.
|
Left: This is the body core assembly and the two body halves together. Not glued yet as I have to machine the joint faces of each body half but they look good together. Right: Moving ahead while I can - I am gluing the two mahogany body halves onto the core section which I recently glued together. |

Working on getting the body halves glued onto the body core.
|
|

Koa has been machined to specific taper values and can now be assembled.
|
Left: The neck and body core components have been sanded and the Koa parts have been machined to a taper that will suit the neck. Next is gluing! Right: Gluing of the 3 components of the neck and body core has been completed. The center strip of Koa is tapered top match the taper of the neck. |

The addition of the Koa center strip will look great.
|
|

The neck and body core will be curly maple and curly Koa - this is the maple part.
|
Left: I cut some maple for the neck and the body core section, also going to use a beautifully fugured center strip of very curly Koa. Should make an impressive combination!. Right: This is the Curly Maple combined with the Curly Koa. I will be doing some sanding and machining so I can assemble them. |

The addition of the Koa center strip will look great.
|
|

I'm using a beautiful Curly Koa bookmatched top for this guitar.
|
Left: This is the top of the guitar - a really nice piece of curly Koa which I have had in my shop for a few years and never used. Right: I cut out some nice mahogany for the body halves so that I could keep hings moving and build the body pieces together. This should be a very nice looking guitar! |

Now have two mahodgany body halves which I will combine with some other woods.
|
|


